Using ADFS 4.0 and updating the SSL certificate.
This is on an Azure VM and I was accessing it remotely.
Ran the normal commands:
Set-AdfsCertificate -CertificateType Service-Communications -Thumbprint thumbprint
Set-AdfsSslCertificate -Thumbprint thumbprint
Error :
Set-AdfsSslCertificate -Thumbprint 24f...b35
Set-AdfsSslCertificate : PS0319: Validation task 'Test-_InternalAdfsSslCertificate' on AD FS server 'localhost' failed with error 'Connecting to remote server localhost failed with the following error message : The client cannot connect to the destination specified in the request. Verify that the service on the destination is running and is accepting requests. Consult the logs and documentation for the WS-Management service running on the destination, most commonly IIS or WinRM. If the destination is the WinRM service, run the following command on the destination to analyze and configure the WinRM service: "winrm quickconfig".
As per the message, running:
winrm qc
and then re-running the command fixed the problem.
Enjoy!
Showing posts with label Windows Server 2016. Show all posts
Showing posts with label Windows Server 2016. Show all posts
Tuesday, August 29, 2017


Tuesday, June 06, 2017
ADFS : Adding extra text to the HRD screen IDP description
This is for Home Realm Discovery for Server 2012 R2 or 2016 (ADFS 3.0 or 4.0).
Building on from @Pierre's ADFS 2016 – Change the Active Directory claim provider display name in the Home Realm Discovery page.
As per that article, the IDP name is coded in the JavaScript as:
var strADCPName = "Corp Users" ;
What you can do is add a line of text beneath it:
This displays something like:
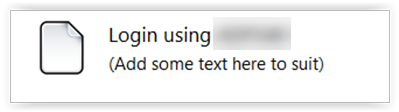
Because of the HTML there are only a limited amount of characters you can add but it is a neat way to add a better description.
If you are wondering how to change the icon (I just used a random one), refer:
ADFS : You can change anything in the Theme structure
Enjoy!
Building on from @Pierre's ADFS 2016 – Change the Active Directory claim provider display name in the Home Realm Discovery page.
As per that article, the IDP name is coded in the JavaScript as:
var strADCPName = "Corp Users" ;
What you can do is add a line of text beneath it:
var strADCPName = "Corp Users <br/><small>(Add some text here to suit)</small>" ;This displays something like:

Because of the HTML there are only a limited amount of characters you can add but it is a neat way to add a better description.
If you are wondering how to change the icon (I just used a random one), refer:
ADFS : You can change anything in the Theme structure
Enjoy!
Friday, June 02, 2017
ADFS : OAuth token timeout
This is for Server 2016 - ADFS 4.0.

These are the OpenID Connect / OAuth options that you have.
But nowhere in the wizard can you set the token timeout.
AD FS Scenarios for Developers shows the following PowerShell commands:
Add native client Add-AdfsNativeClientApplication
Add server application as client Add-AdfsServerApplication
Add Web API / resource Add-AdfsWebApiApplication
Building on this we can do:
get-AdfsNativeClientApplication
Name : AppA - Native application
Identifier : b1...28
ApplicationGroupIdentifier : AppA
Description :
Enabled : True
RedirectUri : {ms-app://s-45...04/}
get-AdfsServerApplication
ADUserPrincipalName :
ClientSecret : ********
JWTSigningCertificateRevocationCheck : None
JWTSigningKeys : {}
JWKSUri :
Name : AppB - Server application
Identifier : 8e...44
ApplicationGroupIdentifier : AppB
Description :
Enabled : True
RedirectUri : {https://localhost:1234/}
get-AdfsWebApiApplication
Name : AppA - Web API
Identifier : {https://localhost:44666/TodoListService}
AccessControlPolicyName : Permit everyone
AccessControlPolicyParameters :
AdditionalAuthenticationRules :
AllowedAuthenticationClassReferences : {}
AllowedClientTypes : Public, Confidential
ApplicationGroupIdentifier : AppA
ApplicationGroupId : 0e...cd
AlwaysRequireAuthentication : False
ClaimsProviderName : {}
DelegationAuthorizationRules :
Enabled : True
ImpersonationAuthorizationRules :
IssuanceAuthorizationRules :
IssueOAuthRefreshTokensTo : AllDevices
IssuanceTransformRules : @RuleTemplate = "LdapClaims"
... Some claims ...
NotBeforeSkew : 0
Description :
PublishedThroughProxy : False
RefreshTokenProtectionEnabled : False
RequestMFAFromClaimsProviders : False
ResultantPolicy : RequireFreshAuthentication:False
IssuanceAuthorizationRules:
{
Permit everyone
}
TokenLifetime : 480
And here we see a token lifetime!
But note the option only applies to web API.
To set this use:
set-AdfsWebApiApplication -TargetIdentifier "https://localhost:44666/TodoListService" -TokenLi
fetime 480
Enjoy!

These are the OpenID Connect / OAuth options that you have.
- Native application
- Server application
- Web API
But nowhere in the wizard can you set the token timeout.
AD FS Scenarios for Developers shows the following PowerShell commands:
Add native client Add-AdfsNativeClientApplication
Add server application as client Add-AdfsServerApplication
Add Web API / resource Add-AdfsWebApiApplication
Building on this we can do:
get-AdfsNativeClientApplication
Name : AppA - Native application
Identifier : b1...28
ApplicationGroupIdentifier : AppA
Description :
Enabled : True
RedirectUri : {ms-app://s-45...04/}
get-AdfsServerApplication
ADUserPrincipalName :
ClientSecret : ********
JWTSigningCertificateRevocationCheck : None
JWTSigningKeys : {}
JWKSUri :
Name : AppB - Server application
Identifier : 8e...44
ApplicationGroupIdentifier : AppB
Description :
Enabled : True
RedirectUri : {https://localhost:1234/}
get-AdfsWebApiApplication
Name : AppA - Web API
Identifier : {https://localhost:44666/TodoListService}
AccessControlPolicyName : Permit everyone
AccessControlPolicyParameters :
AdditionalAuthenticationRules :
AllowedAuthenticationClassReferences : {}
AllowedClientTypes : Public, Confidential
ApplicationGroupIdentifier : AppA
ApplicationGroupId : 0e...cd
AlwaysRequireAuthentication : False
ClaimsProviderName : {}
DelegationAuthorizationRules :
Enabled : True
ImpersonationAuthorizationRules :
IssuanceAuthorizationRules :
IssueOAuthRefreshTokensTo : AllDevices
IssuanceTransformRules : @RuleTemplate = "LdapClaims"
... Some claims ...
NotBeforeSkew : 0
Description :
PublishedThroughProxy : False
RefreshTokenProtectionEnabled : False
RequestMFAFromClaimsProviders : False
ResultantPolicy : RequireFreshAuthentication:False
IssuanceAuthorizationRules:
{
Permit everyone
}
TokenLifetime : 480
And here we see a token lifetime!
But note the option only applies to web API.
To set this use:
set-AdfsWebApiApplication -TargetIdentifier "https://localhost:44666/TodoListService" -TokenLi
fetime 480
Enjoy!
Friday, May 12, 2017
ADFS : Augmenting the default JWT with additional attributes
This is for Server 2016 - ADFS 4.0.
The standard use case is for an ASP.NET application using OpenID Connect / OAuth via the NuGet OWIN packages taking to ADFS.

The standard way is to configure a server application as above.
This all works . The problem is that the ADFS wizard does not have any way to configure claims rules. As a result you get the standard set of claims in the JWT.
aud 8173...1501
iss https://xxx.cloudapp.net/adfs
iat 1494378378
exp 1494381978
http://schemas.microsoft.com/ws/2008/06/identity/claims/authenticationinstant 1494378377
nonce 6362....NmVl
http://schemas.xmlsoap.org/ws/2005/05/identity/claims/nameidentifier 0JrA...H7k=
http://schemas.xmlsoap.org/ws/2005/05/identity/claims/upn user1@dev.local
http://schemas.xmlsoap.org/ws/2005/05/identity/claims/name DEV\user1
c_hash baOc...R8GA
The only user specific details are the "upn" and the "name".
But what if you want more?
You can use the "Web browser accessing a web application" profile as per this.
This profile achieves the result in a roundabout way:
"Behind the scenes, this template creates a native client and new app type called Web application, which is just a Web API with an Identifier (RPID) that matches the native client's client ID. This means the Web application is simultaneously client and resource, so you can assign issuance transform rules as you would with a Web API."
I configured some claims in the wizard:

Now when I authenticate, I get this:
aud c906...3ab4
iss https://xxx.cloudapp.net/adfs
iat 1494379409
exp 1494383009
http://schemas.microsoft.com/ws/2008/06/identity/claims/authenticationinstant 1494379408
nonce 6362...NTk2
http://schemas.xmlsoap.org/ws/2005/05/identity/claims/nameidentifier PRUA...50U=
http://schemas.xmlsoap.org/ws/2005/05/identity/claims/name DEV\user1
http://schemas.xmlsoap.org/ws/2005/05/identity/claims/upn user1@dev.local
http://schemas.xmlsoap.org/ws/2005/05/identity/claims/givenname User1
http://schemas.xmlsoap.org/ws/2005/05/identity/claims/surname Test
http://schemas.xmlsoap.org/ws/2005/05/identity/claims/emailaddress user1@company.com
http://schemas.xmlsoap.org/claims/CommonName User1 Test
apptype Public
appid c906...3ab4
http://schemas.microsoft.com/ws/2008/06/identity/claims/authenticationmethod urn:oasis:names:tc:SAML:2.0:ac:classes:PasswordProtectedTransport
ver 1.0
http://schemas.microsoft.com/identity/claims/scope openid
c_hash -0ZX...Z81A
You will also notice that the apptype is "Public" i.e. a web site as opposed to "confidential" i.e. a web API.
I also answered a question in stackoverflow along these lines here.
As per the discussion from @Efrain:
"As indicated in @nzpcmad's answer, it appears that custom claims in the id_token using the default URL-parameter-encoded GET redirect is simply not supported. The reason for this may be that there is an URL length limit, but I find that quite questionable.
Enjoy!
The standard use case is for an ASP.NET application using OpenID Connect / OAuth via the NuGet OWIN packages taking to ADFS.

The standard way is to configure a server application as above.
This all works . The problem is that the ADFS wizard does not have any way to configure claims rules. As a result you get the standard set of claims in the JWT.
aud 8173...1501
iss https://xxx.cloudapp.net/adfs
iat 1494378378
exp 1494381978
http://schemas.microsoft.com/ws/2008/06/identity/claims/authenticationinstant 1494378377
nonce 6362....NmVl
http://schemas.xmlsoap.org/ws/2005/05/identity/claims/nameidentifier 0JrA...H7k=
http://schemas.xmlsoap.org/ws/2005/05/identity/claims/upn user1@dev.local
http://schemas.xmlsoap.org/ws/2005/05/identity/claims/name DEV\user1
c_hash baOc...R8GA
The only user specific details are the "upn" and the "name".
But what if you want more?
You can use the "Web browser accessing a web application" profile as per this.
This profile achieves the result in a roundabout way:
"Behind the scenes, this template creates a native client and new app type called Web application, which is just a Web API with an Identifier (RPID) that matches the native client's client ID. This means the Web application is simultaneously client and resource, so you can assign issuance transform rules as you would with a Web API."
I configured some claims in the wizard:

Now when I authenticate, I get this:
aud c906...3ab4
iss https://xxx.cloudapp.net/adfs
iat 1494379409
exp 1494383009
http://schemas.microsoft.com/ws/2008/06/identity/claims/authenticationinstant 1494379408
nonce 6362...NTk2
http://schemas.xmlsoap.org/ws/2005/05/identity/claims/nameidentifier PRUA...50U=
http://schemas.xmlsoap.org/ws/2005/05/identity/claims/name DEV\user1
http://schemas.xmlsoap.org/ws/2005/05/identity/claims/upn user1@dev.local
http://schemas.xmlsoap.org/ws/2005/05/identity/claims/givenname User1
http://schemas.xmlsoap.org/ws/2005/05/identity/claims/surname Test
http://schemas.xmlsoap.org/ws/2005/05/identity/claims/emailaddress user1@company.com
http://schemas.xmlsoap.org/claims/CommonName User1 Test
apptype Public
appid c906...3ab4
http://schemas.microsoft.com/ws/2008/06/identity/claims/authenticationmethod urn:oasis:names:tc:SAML:2.0:ac:classes:PasswordProtectedTransport
ver 1.0
http://schemas.microsoft.com/identity/claims/scope openid
c_hash -0ZX...Z81A
You will also notice that the apptype is "Public" i.e. a web site as opposed to "confidential" i.e. a web API.
I also answered a question in stackoverflow along these lines here.
As per the discussion from @Efrain:
"As indicated in @nzpcmad's answer, it appears that custom claims in the id_token using the default URL-parameter-encoded GET redirect is simply not supported. The reason for this may be that there is an URL length limit, but I find that quite questionable.
Anyway, apparently this restriction does not apply when the token is
returned in a POST redirect. That's also why people describe it working
just fine for MVC applications.
So I was able to work around the problem by redirecting the response to a back-end API endpoint (POST), which just redirects it to the front-end (SPA) again, but as a GET request with URL-encoded parameters:
So I was able to work around the problem by redirecting the response to a back-end API endpoint (POST), which just redirects it to the front-end (SPA) again, but as a GET request with URL-encoded parameters:
public class LoginController : ApiController
{
    [HttpPost]
    [Route("login")]
    public HttpResponseMessage Login(FormDataCollection formData)
    {
        var token = formData["id_token"];
        var state = formData["state"];
        var response = Request.CreateResponse(HttpStatusCode.Moved);
        var frontendUri = ConfigurationManager.AppSettings["ad:FrontendUri"];
        response.Headers.Location = new Uri($"{frontendUri}#id_token={token}
&state={state}");
return response;
}
}
&response_mode=form_post to the OAuth request URL."Enjoy!
Monday, December 12, 2016
Swagger : Using Swagger for Implicit Grant on ADFS 4.0
This is based on this post.
I like Swagger. It maps your REST API and documents them and then allows you to test them from the documentation. Very neat.
You can write the code first and then Swagger reflects the API - much like the default API page in an MVC project or you can use the Swagger UI link to write the contract first and then generate.
Very much along the lines of code first vs. contract first.
(Aside: Once upon a time, I used SOAP and wsdl's and the WSCF (Web Services Contract First) project from thinktecture that does much the same thing. That article is dated from 2006! The more things change ...)
ADFS 4.0 (Server 2016) opens up the OpenID Connect / OAuth stack with full support for all four grant types (refer previous blog entries for a number of examples of this).
So it was a no brainer to try and put the two together.
I used this as a start point and that post gives a good overview of Swagger and how to integrate into a .NET MVC project with NuGet Swashbuckle.
The problem of course is that you need to authenticate the web API and the only OAuth type support in Swagger as I write is the implicit flow.
So following the article, as usual the gist is here.
You will notice that there is a scope called "sampleui". It's simple to add this to the Scopes section in the ADFS wizard.
So we run up the project in VS 2015 and then navigate to:
https://localhost:44326/swagger
(or whatever port your web API project uses).

Notice the highlighted exclamation mark in red.
Click that.

Check the boxes, click "Authorize".
It should take you off to the ADFS login page where you authenticate.

Notice the exclamation mark is now blue (and if you click it you can Logout).
Now we put a value e.g. 5 in the "id" box and click "Try it out".
And it returns:
I've tried everything I can think of but I can't get this to work.
The JWT returned is:
{
"aud": "microsoft:identityserver:7b23c943-6782-4d5b-b56c-7ecd59da17f2",
"iss": "http://my-adfs/adfs/services/trust",
"iat": 1480889151,
"exp": 1480892751,
"apptype": "Public",
"appid": "7b2...7f2",
"authmethod": "urn:oasis:names:tc:SAML:2.0:ac:classes:PasswordProtectedTransport",
"auth_time": "2016-12-04T22:05:50.803Z",
"ver": "1.0",
"scp": "sampleapi user_impersonation"
}
and when I access the API normally from a client in the VS project, I get the JWT:
{
"aud": "https://localhost:44326/NativeTodoListService1",
"iss": "http://my-adfs/adfs/services/trust",
"iat": 1480889366,
"exp": 1480892966,
"apptype": "Confidential",
"appid": "0cc...549",
"authmethod": "http://schemas.microsoft.com/ws/2008/06/identity/authenticationmethod/password",
"auth_time": "2016-12-04T22:09:26.486Z",
"ver": "1.0"
}
I suspect the problem is that the "aud" is wrong. But I can't figure out how to get rid of the "microsoft:identityserver" one?
So close :-(
Any bright ideas?
Enjoy!
I like Swagger. It maps your REST API and documents them and then allows you to test them from the documentation. Very neat.
You can write the code first and then Swagger reflects the API - much like the default API page in an MVC project or you can use the Swagger UI link to write the contract first and then generate.
Very much along the lines of code first vs. contract first.
(Aside: Once upon a time, I used SOAP and wsdl's and the WSCF (Web Services Contract First) project from thinktecture that does much the same thing. That article is dated from 2006! The more things change ...)
ADFS 4.0 (Server 2016) opens up the OpenID Connect / OAuth stack with full support for all four grant types (refer previous blog entries for a number of examples of this).
So it was a no brainer to try and put the two together.
I used this as a start point and that post gives a good overview of Swagger and how to integrate into a .NET MVC project with NuGet Swashbuckle.
The problem of course is that you need to authenticate the web API and the only OAuth type support in Swagger as I write is the implicit flow.
So following the article, as usual the gist is here.
You will notice that there is a scope called "sampleui". It's simple to add this to the Scopes section in the ADFS wizard.
So we run up the project in VS 2015 and then navigate to:
https://localhost:44326/swagger
(or whatever port your web API project uses).

Notice the highlighted exclamation mark in red.
Click that.

Check the boxes, click "Authorize".
It should take you off to the ADFS login page where you authenticate.

Notice the exclamation mark is now blue (and if you click it you can Logout).
Now we put a value e.g. 5 in the "id" box and click "Try it out".
And it returns:
{
  "Message": "Authorization has been denied for this request."
}
I've tried everything I can think of but I can't get this to work.
The JWT returned is:
{
"aud": "microsoft:identityserver:7b23c943-6782-4d5b-b56c-7ecd59da17f2",
"iss": "http://my-adfs/adfs/services/trust",
"iat": 1480889151,
"exp": 1480892751,
"apptype": "Public",
"appid": "7b2...7f2",
"authmethod": "urn:oasis:names:tc:SAML:2.0:ac:classes:PasswordProtectedTransport",
"auth_time": "2016-12-04T22:05:50.803Z",
"ver": "1.0",
"scp": "sampleapi user_impersonation"
}
and when I access the API normally from a client in the VS project, I get the JWT:
{
"aud": "https://localhost:44326/NativeTodoListService1",
"iss": "http://my-adfs/adfs/services/trust",
"iat": 1480889366,
"exp": 1480892966,
"apptype": "Confidential",
"appid": "0cc...549",
"authmethod": "http://schemas.microsoft.com/ws/2008/06/identity/authenticationmethod/password",
"auth_time": "2016-12-04T22:09:26.486Z",
"ver": "1.0"
}
I suspect the problem is that the "aud" is wrong. But I can't figure out how to get rid of the "microsoft:identityserver" one?
So close :-(
Any bright ideas?
Enjoy!
Monday, November 28, 2016
Postman : Using Postman for Implicit Grant on ADFS 4.0
This is ADFS 4.0 (Server 2016) and you need the official release.
I tried to get this working on the TPx series but no joy.
I kept getting the error:
"MSIS9358: Received invalid OAuth authorization request. The authorization server does not support the response type 'token' for confidential clients."
However, there is an extra entry in the official release which seems to to the job.

When you select this entry, you first get to configure a "Native Application" that generates a ClientID and you need to provide a "Redirect URI" and then an "Access Policy".
You end up with something like:

and you can configure the web application with claims etc.
The "Native Application" seems a bit weird but refer Customizing Id_Token Claims with OpenId Connect in AD FS 2016.
"Behind the scenes, this template creates a native client and new app type called Web application, which is just a Web API with an Identifier (RPID) that matches the native client's client ID. This means the Web application is simultaneously client and resource, so you can assign issuance transform rules as you would with a Web API."
As always, the gist is here.
You need to run this in a browser, The implicit flow returns an access token straight away. You miss out the intermediate step of getting a code and then using that for an access token. It's normally used for SPA where JavaScript is involved. Hence no security key is required as that would be easy to access.
If you look at the access token with e.g. jwt.io, you see:

Notice the "apptype" is "Public" and this is what is required for this flow. Hence the error about "confidential clients".
Enjoy!
I tried to get this working on the TPx series but no joy.
I kept getting the error:
"MSIS9358: Received invalid OAuth authorization request. The authorization server does not support the response type 'token' for confidential clients."
However, there is an extra entry in the official release which seems to to the job.

When you select this entry, you first get to configure a "Native Application" that generates a ClientID and you need to provide a "Redirect URI" and then an "Access Policy".
You end up with something like:

and you can configure the web application with claims etc.
The "Native Application" seems a bit weird but refer Customizing Id_Token Claims with OpenId Connect in AD FS 2016.
"Behind the scenes, this template creates a native client and new app type called Web application, which is just a Web API with an Identifier (RPID) that matches the native client's client ID. This means the Web application is simultaneously client and resource, so you can assign issuance transform rules as you would with a Web API."
As always, the gist is here.
You need to run this in a browser, The implicit flow returns an access token straight away. You miss out the intermediate step of getting a code and then using that for an access token. It's normally used for SPA where JavaScript is involved. Hence no security key is required as that would be easy to access.
If you look at the access token with e.g. jwt.io, you see:

Notice the "apptype" is "Public" and this is what is required for this flow. Hence the error about "confidential clients".
Enjoy!
Friday, November 11, 2016
Postman : Using Postman for Resource Owner Password Grant on ADFS
This is on Server 2016 TP5 - ADFS 4.0
Couldn't find any examples of this so rolled my own.
As always, the gist is here,
Note that you need the user in the "domain\user" format.
Be careful of this flow - you are potentially exposing the user name and password.
This is supposed to be for "trusted" clients.
Enjoy!
Couldn't find any examples of this so rolled my own.
As always, the gist is here,
Note that you need the user in the "domain\user" format.
Be careful of this flow - you are potentially exposing the user name and password.
This is supposed to be for "trusted" clients.
Enjoy!
Postman : OpenID Connect / OAuth errors
This is on ADFS 4.0 on Server 2016 TP5.
Yes, I know the official release is out but I've had other priorities :-)
So some of this may not apply to the official release.
This is based on the Postman collection described here.
While I was trying to get this to work, I encountered a number of errors and quickly established that there is basically zero documentation on any of them.
So I documented as I went along.
There is a authorisation request. This is an https request with a number of parameters and I removed them manually one by one.
Remove client id
MSIS9220: Received invalid OAuth authorization request. The 'client_id' parameter is missing or found empty. The client could not be validated.
Remove "response_type=code"
MSIS7065: There are no registered protocol handlers on path /adfs/oauth2/authorize to process the incoming request.
Remove "redirect_uri=https%3A%2F%2Fmy-pc%2FTodoListWebApp%2F"
MSIS9221: Received invalid OAuth authorization request. The 'redirect_uri' parameter is missing or found empty. Public clients must send the redirect_uri parameter with valid redirect URI in the OAuth authorization request.
This is followed by a REST token request.
This is driven by Postman and one of the nice features of Postman is there is a tick box next to each parameter and if you untick the box, that parameter is not sent.
Remove client_id
MSIS9629: Received invalid Client credentials.'client_secret' was present but 'client_id' parameter is missing or found empty.
Remove code
MSIS9610: The 'code' parameter is not specified. The access token request must contain the 'code' parameter which specifies the previously issued authorization code."
Remove "grant type"
MSIS7065: There are no registered protocol handlers on path /adfs/oauth2/token to process the incoming request.
Remove "client_secret"
MSIS9267: No Client credentials found in the request. Client 'a07...e75' is configured as a confidential client.
Remove "redirect_uri"
MSIS9221: Received invalid OAuth authorization request. The 'redirect_uri' parameter is missing or found empty. Public clients must send the redirect_uri parameter with valid redirect URI in the OAuth authorization request.
MSIS9608: The 'redirect_uri' parameter is not specified. The access token request must contain 'redirect_uri' parameter for public clients
Note there are two slightly different errors here. I noticed this in some other scenarios as well.
The first error is from the ADFS event log i.e. the server side (which is where most of the errors were copied from).
The second is what Postman actually reports i.e. the client side.
I have no idea why they are different?
Enjoy!
Yes, I know the official release is out but I've had other priorities :-)
So some of this may not apply to the official release.
This is based on the Postman collection described here.
While I was trying to get this to work, I encountered a number of errors and quickly established that there is basically zero documentation on any of them.
So I documented as I went along.
There is a authorisation request. This is an https request with a number of parameters and I removed them manually one by one.
Remove client id
MSIS9220: Received invalid OAuth authorization request. The 'client_id' parameter is missing or found empty. The client could not be validated.
Remove "response_type=code"
MSIS7065: There are no registered protocol handlers on path /adfs/oauth2/authorize to process the incoming request.
Remove "redirect_uri=https%3A%2F%2Fmy-pc%2FTodoListWebApp%2F"
MSIS9221: Received invalid OAuth authorization request. The 'redirect_uri' parameter is missing or found empty. Public clients must send the redirect_uri parameter with valid redirect URI in the OAuth authorization request.
This is followed by a REST token request.
This is driven by Postman and one of the nice features of Postman is there is a tick box next to each parameter and if you untick the box, that parameter is not sent.
Remove client_id
MSIS9629: Received invalid Client credentials.'client_secret' was present but 'client_id' parameter is missing or found empty.
Remove code
MSIS9610: The 'code' parameter is not specified. The access token request must contain the 'code' parameter which specifies the previously issued authorization code."
Remove "grant type"
MSIS7065: There are no registered protocol handlers on path /adfs/oauth2/token to process the incoming request.
Remove "client_secret"
MSIS9267: No Client credentials found in the request. Client 'a07...e75' is configured as a confidential client.
Remove "redirect_uri"
MSIS9221: Received invalid OAuth authorization request. The 'redirect_uri' parameter is missing or found empty. Public clients must send the redirect_uri parameter with valid redirect URI in the OAuth authorization request.
MSIS9608: The 'redirect_uri' parameter is not specified. The access token request must contain 'redirect_uri' parameter for public clients
Note there are two slightly different errors here. I noticed this in some other scenarios as well.
The first error is from the ADFS event log i.e. the server side (which is where most of the errors were copied from).
The second is what Postman actually reports i.e. the client side.
I have no idea why they are different?
Enjoy!
Wednesday, November 09, 2016
Postman : Authorisation Code Grant on Server 2016 - ADFS 4.0
I previously blogged on ADFS - Web App and Web API on Server 2016 TP4 ADFS 4.0.
This also shows the ADFS configuration
This is using Authorisation Code Grant in a .NET C# program to call the default template API i.e.
/api/values
Then I was asked how to do this with Postman which turned out to be less trivial than I thought.
As always, the Postman gist is here.
There is an authorisation request, a token request and the API request.
The VS project (as above) runs on my PC and has the web site and web service.
Running the authorisation request from a browser redirects to ADFS to authenticate and then returns a code in the query string..
As in "/?code=NjX0...".
We paste the code into the body of the second request (the code parameter) and then send it. This returns an access token, a refresh token and an ID token.
The Postman script automatically posts the access token into the third request (the API call) and this returns:
[
"value1",
"value2"
]
as we would expect.
The access token and the id token are encoded and can be decoded with something like jwt.io.
The refresh token is just a long GUID.
This results in:
Access token:
{
"aud": "https://my-pc/TodoListService/",
"iss": "http://my-adfs/adfs/services/trust",
"iat": 1478562128,
"exp": 1478565728,
"apptype": "Confidential",
"appid": "a07...e75",
"authmethod": "urn:oasis:names:tc:SAML:2.0:ac:classes:PasswordProtectedTransport",
"auth_time": "2016-11-07T22:50:31.925Z",
"ver": "1.0",
"scp": "openid user_impersonation"
}
ID token:
{
"aud": "a07...e75",
"iss": "https://my-adfs/adfs",
"iat": 1478562128,
"exp": 1478565728,
"auth_time": 1478559031,
"sub": "v2O...nA=",
"upn": "user1@dev.local",
"unique_name": "DEV\\user1"
The ADFS wizard allows you to add claims to the web API part.
So I added the usual LDAP rules for email, given name and surname.
After this change, this resulted in a new access token.
{
"aud": "https://my-pc/TodoListService/",
"iss": "http://my-adfs/adfs/services/trust",
"iat": 1478562556,
"exp": 1478566156,
"email": "user1@company.com",
"given_name": "User",
"family_name": "One",
"apptype": "Confidential",
"appid": "a07...e75",
"authmethod": "urn:oasis:names:tc:SAML:2.0:ac:classes:PasswordProtectedTransport",
"auth_time": "2016-11-07T23:49:15.935Z",
"ver": "1.0",
"scp": "openid user_impersonation"
}
Enjoy!
This also shows the ADFS configuration
This is using Authorisation Code Grant in a .NET C# program to call the default template API i.e.
/api/values
Then I was asked how to do this with Postman which turned out to be less trivial than I thought.
As always, the Postman gist is here.
There is an authorisation request, a token request and the API request.
The VS project (as above) runs on my PC and has the web site and web service.
Running the authorisation request from a browser redirects to ADFS to authenticate and then returns a code in the query string..
As in "/?code=NjX0...".
We paste the code into the body of the second request (the code parameter) and then send it. This returns an access token, a refresh token and an ID token.
The Postman script automatically posts the access token into the third request (the API call) and this returns:
[
"value1",
"value2"
]
as we would expect.
The access token and the id token are encoded and can be decoded with something like jwt.io.
The refresh token is just a long GUID.
This results in:
Access token:
{
"aud": "https://my-pc/TodoListService/",
"iss": "http://my-adfs/adfs/services/trust",
"iat": 1478562128,
"exp": 1478565728,
"apptype": "Confidential",
"appid": "a07...e75",
"authmethod": "urn:oasis:names:tc:SAML:2.0:ac:classes:PasswordProtectedTransport",
"auth_time": "2016-11-07T22:50:31.925Z",
"ver": "1.0",
"scp": "openid user_impersonation"
}
ID token:
{
"aud": "a07...e75",
"iss": "https://my-adfs/adfs",
"iat": 1478562128,
"exp": 1478565728,
"auth_time": 1478559031,
"sub": "v2O...nA=",
"upn": "user1@dev.local",
"unique_name": "DEV\\user1"
The ADFS wizard allows you to add claims to the web API part.
So I added the usual LDAP rules for email, given name and surname.
After this change, this resulted in a new access token.
{
"aud": "https://my-pc/TodoListService/",
"iss": "http://my-adfs/adfs/services/trust",
"iat": 1478562556,
"exp": 1478566156,
"email": "user1@company.com",
"given_name": "User",
"family_name": "One",
"apptype": "Confidential",
"appid": "a07...e75",
"authmethod": "urn:oasis:names:tc:SAML:2.0:ac:classes:PasswordProtectedTransport",
"auth_time": "2016-11-07T23:49:15.935Z",
"ver": "1.0",
"scp": "openid user_impersonation"
}
Enjoy!
Friday, September 02, 2016
Postman : Using Postman for Confidential Grant on ADFS
Continuing the series for ADFS 4.0 on Server 2016.
The confidential flow relies on a client_id and a secret_key to authenticate the user.
The gist for the Postman collection is here.
You need to update your ADFS FQDN and the client_id and secret_key.
ADFS returns:
{
"access_token": "eyJ...ErQ",
"token_type": "bearer",
"expires_in": 3600,
"scope": "openid"
}
You can plug the access token into a JWT viewer.
Enjoy!
The confidential flow relies on a client_id and a secret_key to authenticate the user.
The gist for the Postman collection is here.
You need to update your ADFS FQDN and the client_id and secret_key.
ADFS returns:
{
"access_token": "eyJ...ErQ",
"token_type": "bearer",
"expires_in": 3600,
"scope": "openid"
}
You can plug the access token into a JWT viewer.
Enjoy!
Thursday, August 25, 2016
Postman : Using Postman to get "Userinfo" on ADFS
This follows on from Postman : Using Postman to get "Userinfo" on Azure AD.
There's a ton of stuff on Azure AD but very little on ADFS.
The gist is here.
Same instructions as the Azure AD article.
In terms of configuring ADFS, have a look at ADFS - Web App and Web API on Server 2016 TP4 ADFS 4.0 . You only need to do the Web App. part.
Enjoy!
There's a ton of stuff on Azure AD but very little on ADFS.
The gist is here.
Same instructions as the Azure AD article.
In terms of configuring ADFS, have a look at ADFS - Web App and Web API on Server 2016 TP4 ADFS 4.0 . You only need to do the Web App. part.
Enjoy!
Friday, August 12, 2016
ADFS : Getting the IIS logs and event logs for ADFS 3.0
This is for ADFS on Server 2012 R2 and above since ADFS in these versions no longer runs on IIS but runs directly on HTTP.SYS.
So there was a question over on the ADFS forum around looking at the IIS logs and @Pierre replied:
Every access generates logs as long as you enabled the audit. So the information is still there, just in a different format.
Just an example:
And here is the example of output:
but that got me wondering about "Get-WinEvent". What else can you do with it?
What logs are there?
PS C:\>
PS C:\> Get-WinEvent -ListLog *
LogMode MaximumSizeInBytes RecordCount LogName
------- ------------------ ----------- -------
Circular 1052672 180 Active Directory Web Services
Circular 20971520 20503 Application
Circular 15532032 147 DFS Replication
Circular 1052672 1825 Directory Service
Circular 104857600 237 DNS Server
Circular 20971520 0 HardwareEvents
Circular 1052672 0 Internet Explorer
Circular 20971520 0 Key Management Service
Circular 134217728 198680 Security
Circular 20971520 30088 System
Circular 1052672 0 Windows Azure
Circular 15728640 15575 Windows PowerShell
Circular 52428800 1830 AD FS/Admin
Circular 52428800 0 DRS/Admin
...
Hang ten! There's an ADFS log!
PS C:\> Get-WinEvent -LogName "AD FS/Admin"
ProviderName: AD FS
TimeCreated Id LevelDisplayName Message
----------- -- ---------------- -------
8/11/2016 10:45:47 PM 415 Warning The SSL certificate does not contain all UPN suffix values that ...
8/11/2016 10:13:19 PM 364 Error Encountered error during federation passive request. ...
8/11/2016 10:11:57 PM 364 Error Encountered error during federation passive request. ...
8/11/2016 10:09:22 PM 364 Error Encountered error during federation passive request. ...
8/11/2016 9:53:13 PM 364 Error Encountered error during federation passive request. ...
It goes on forever and most of the time I am only interested in the "Message" column (say the top 10) and I don't want it truncated. This leads to:
PS C:\> Get-WinEvent -LogName "AD FS/Admin" | Select Message -First 10 | out-string -Width 600
Message
-------
The SSL certificate does not contain all UPN suffix values that exist in the enterprise. Users with UPN suffix values not represented in the certificate will not be able to Workplace-Join their devices. For more information, see http:// go.microsoft.com/fwlink/?LinkId=311954.
Encountered error during federation passive request. ...
Encountered error during federation passive request. ...
...
This is the same information that you get in the Event log in ADFS.
Enjoy!
So there was a question over on the ADFS forum around looking at the IIS logs and @Pierre replied:
Every access generates logs as long as you enabled the audit. So the information is still there, just in a different format.
Just an example:
Get-WinEvent -FilterHashtable @{LogName="Security";ID=403} |
%{ $_.Properties.Value -join " " }
And here is the example of output:
00000000-0000-0000-9758-0080000000b3 2016-08-11 15:32:58 10.0.0.7
  GET /adfs/Proxy/GetConfiguration - 443 10.0.0.6 - 0 - - - False -
00000000-0000-0000-662e-0080000000e1 2016-08-11 15:32:36 10.0.0.7
GET /adfs/Proxy/webapplicationproxy/store ?api-version=1 443 10.0.0.6 - 0 - - -
False - 00000000-0000-0000-652e-0080000000e1 2016-08-11 15:32:06 10.0.0.7
GET /adfs/Proxy/webapplication
but that got me wondering about "Get-WinEvent". What else can you do with it?
What logs are there?
PS C:\>
PS C:\> Get-WinEvent -ListLog *
LogMode MaximumSizeInBytes RecordCount LogName
------- ------------------ ----------- -------
Circular 1052672 180 Active Directory Web Services
Circular 20971520 20503 Application
Circular 15532032 147 DFS Replication
Circular 1052672 1825 Directory Service
Circular 104857600 237 DNS Server
Circular 20971520 0 HardwareEvents
Circular 1052672 0 Internet Explorer
Circular 20971520 0 Key Management Service
Circular 134217728 198680 Security
Circular 20971520 30088 System
Circular 1052672 0 Windows Azure
Circular 15728640 15575 Windows PowerShell
Circular 52428800 1830 AD FS/Admin
Circular 52428800 0 DRS/Admin
...
Hang ten! There's an ADFS log!
PS C:\> Get-WinEvent -LogName "AD FS/Admin"
ProviderName: AD FS
TimeCreated Id LevelDisplayName Message
----------- -- ---------------- -------
8/11/2016 10:45:47 PM 415 Warning The SSL certificate does not contain all UPN suffix values that ...
8/11/2016 10:13:19 PM 364 Error Encountered error during federation passive request. ...
8/11/2016 10:11:57 PM 364 Error Encountered error during federation passive request. ...
8/11/2016 10:09:22 PM 364 Error Encountered error during federation passive request. ...
8/11/2016 9:53:13 PM 364 Error Encountered error during federation passive request. ...
It goes on forever and most of the time I am only interested in the "Message" column (say the top 10) and I don't want it truncated. This leads to:
PS C:\> Get-WinEvent -LogName "AD FS/Admin" | Select Message -First 10 | out-string -Width 600
Message
-------
The SSL certificate does not contain all UPN suffix values that exist in the enterprise. Users with UPN suffix values not represented in the certificate will not be able to Workplace-Join their devices. For more information, see http:// go.microsoft.com/fwlink/?LinkId=311954.
Encountered error during federation passive request. ...
Encountered error during federation passive request. ...
...
This is the same information that you get in the Event log in ADFS.
Enjoy!
Monday, May 02, 2016
ADFS : Server 2016 OAuth JWT is missing scope and NameID
This is for Active Directory Federation Services on Server 2016 Technical Preview 4 / 5.
As per ADFS : Daemon and Web API on Server 2016 TP4 ADFS 4.0, I made the comment:
"The Azure AD sample relies on scope and NameID claims being returned in the JWT token. This is OK in Azure AD where the claims are static and Azure ID knows the ID of the application which is returned as a GUID in the NameID claim. ADFS AFAIK does not have claims rules for this so I hard coded the NameID. Hopefully, this will be resolved as more documentation is forthcoming."
Then I came across AD FS On-behalf-of Authentication in Windows Server 2016.
As per that article, you have to manually generate the scope claims!
They use the following claims rules:
This means that every time you alter the scopes you need to alter the claims rules.
Hopefully, this will be fixed before the official release.
The other issue I had was with NameID.
As per that article:
"From AD FS we are issuing the Nmae claim but we are not issuing NameIdentifier claim. The sample uses NameIdentifier to uniquely key in the ToDo items. For simplicity, you can safely remove the NameIdentifier with Name claim in the code. Find and replace all occurences of NameIdentifier wiht Name."
(Spelling as per original article.)
My solution was simply to generate a static NameID. The whole point is to have a unique key into the token store.
Enjoy!
As per ADFS : Daemon and Web API on Server 2016 TP4 ADFS 4.0, I made the comment:
"The Azure AD sample relies on scope and NameID claims being returned in the JWT token. This is OK in Azure AD where the claims are static and Azure ID knows the ID of the application which is returned as a GUID in the NameID claim. ADFS AFAIK does not have claims rules for this so I hard coded the NameID. Hopefully, this will be resolved as more documentation is forthcoming."
Then I came across AD FS On-behalf-of Authentication in Windows Server 2016.
As per that article, you have to manually generate the scope claims!
They use the following claims rules:
These match the scope check boxes configured in ADFS in the application group.@RuleName = "All claims" c:[] => issue(claim = c); @RuleName = "Issue open id scope" => issue(Type = "http://schemas.microsoft.com/identity/claims/scope",Value = "openid"); @RuleName = "Issue user_impersonation scope" => issue(Type = "http://schemas.microsoft.com/identity/claims/scope",Value = "user_impersonation");
This means that every time you alter the scopes you need to alter the claims rules.
Hopefully, this will be fixed before the official release.
The other issue I had was with NameID.
As per that article:
"From AD FS we are issuing the Nmae claim but we are not issuing NameIdentifier claim. The sample uses NameIdentifier to uniquely key in the ToDo items. For simplicity, you can safely remove the NameIdentifier with Name claim in the code. Find and replace all occurences of NameIdentifier wiht Name."
(Spelling as per original article.)
My solution was simply to generate a static NameID. The whole point is to have a unique key into the token store.
Enjoy!
ADFS : OpenID Connect and OAuth2 support on Server 2016 TP5
This is for Active Directory Federation Services on Server 2016 Technical Preview 5.
This is the last TP before RTM.
I've done a series of posts on this capability in TP4 and I tried a few of the use cases in TP5 and they worked no problem.
All you need to do is to change the metadata URL and the clientID and the secret key.
So much easier when you have a working sample as reference :-).
There is a similar series of Microsoft posts here. I believe that more content is going to be added prior to RTM.
The format of these posts is somewhat different to the way that I do them but I will leave you to decide which way you prefer!
Enjoy!
This is the last TP before RTM.
I've done a series of posts on this capability in TP4 and I tried a few of the use cases in TP5 and they worked no problem.
All you need to do is to change the metadata URL and the clientID and the secret key.
So much easier when you have a working sample as reference :-).
There is a similar series of Microsoft posts here. I believe that more content is going to be added prior to RTM.
The format of these posts is somewhat different to the way that I do them but I will leave you to decide which way you prefer!
Enjoy!
Thursday, April 28, 2016
ADFS : Daemon and Web API on Server 2016 TP4 ADFS 4.0
This follows on from my previous series of posts around taking the Azure AD OpenID Connect / OAuth2 samples and getting them to run on ADFS on TP4.
This uses the active-directory-dotnet-daemon sample that has a Windows console application calling a Web API using its application identity.
This is for Active Directory Federation Services on Server 2016 Technical Preview 4.
Just ignore all the Azure AD comments. There is no Azure in this solution.
In the solution, I've set the Web API to be at localhost:44326.
Just to re-iterate - the ADFS has to be Server 2016 - TP4 and above. This will not work on Server 2012 R2 - ADFS 3.0.
As before, the changes are all in a gist here.
This uses the client credential flow with ADAL i.e.
result = authContext.AcquireToken(todoListResourceId, clientCredential);
where clientCredential is a combination of the clientID and the secret key. There is no authentication pop up where a user name and password needs to be entered.
The Azure AD sample relies on scope and NameID claims being returned in the JWT token. This is OK in Azure AD where the claims are static and Azure ID knows the ID of the application which is returned as a GUID in the NameID claim. ADFS AFAIK does not have claims rules for this so I hard coded the NameID. Hopefully, this will be resolved as more documentation is forthcoming. (But see ADFS : Server 2016 OAuth JWT is missing scope and NameID).
On to the ADFS configuration:
New Application Group - "Server Application and Web API".
For the Server Application:

You also need to generate a secret key. Copy this key before you leave the page because you can't get back to it. (You can, however, generate a new one).
The Client ID and the secret key need to be copied into the daemon app.config here:
For the Web API:


The custom claim rule for NameID is:
=> issue(Type = "http://schemas.xmlsoap.org/ws/2005/05/identity/claims/nameidentifier", Value = "abcd");

Now run up the sample and the console application will show something like:
Posting to To Do list at 28/04/2016 9:03:27 p.m.
Successfully posted new To Do item: Task at time: 28/04/2016 9:03:27 p.m.
Retrieving To Do list at 28/04/2016 9:03:33 p.m.
Task at time: 28/04/2016 9:02:10 p.m.
Task at time: 28/04/2016 9:03:27 p.m.
Task at time: 28/04/2016 9:02:36 p.m.
Total item count: 3
Posting to To Do list at 28/04/2016 9:03:46 p.m.
Enjoy!
This uses the active-directory-dotnet-daemon sample that has a Windows console application calling a Web API using its application identity.
This is for Active Directory Federation Services on Server 2016 Technical Preview 4.
Just ignore all the Azure AD comments. There is no Azure in this solution.
In the solution, I've set the Web API to be at localhost:44326.
Just to re-iterate - the ADFS has to be Server 2016 - TP4 and above. This will not work on Server 2012 R2 - ADFS 3.0.
As before, the changes are all in a gist here.
This uses the client credential flow with ADAL i.e.
result = authContext.AcquireToken(todoListResourceId, clientCredential);
where clientCredential is a combination of the clientID and the secret key. There is no authentication pop up where a user name and password needs to be entered.
The Azure AD sample relies on scope and NameID claims being returned in the JWT token. This is OK in Azure AD where the claims are static and Azure ID knows the ID of the application which is returned as a GUID in the NameID claim. ADFS AFAIK does not have claims rules for this so I hard coded the NameID. Hopefully, this will be resolved as more documentation is forthcoming. (But see ADFS : Server 2016 OAuth JWT is missing scope and NameID).
On to the ADFS configuration:
New Application Group - "Server Application and Web API".
For the Server Application:

You also need to generate a secret key. Copy this key before you leave the page because you can't get back to it. (You can, however, generate a new one).
The Client ID and the secret key need to be copied into the daemon app.config here:
 <add key="ida:ClientId" value="bee24b9a-13ac-45fc-988c-8cce06160c07" />
 <add key="ida:AppKey" value="wp...nE" />
For the Web API:


The custom claim rule for NameID is:
=> issue(Type = "http://schemas.xmlsoap.org/ws/2005/05/identity/claims/nameidentifier", Value = "abcd");

Now run up the sample and the console application will show something like:
Posting to To Do list at 28/04/2016 9:03:27 p.m.
Successfully posted new To Do item: Task at time: 28/04/2016 9:03:27 p.m.
Retrieving To Do list at 28/04/2016 9:03:33 p.m.
Task at time: 28/04/2016 9:02:10 p.m.
Task at time: 28/04/2016 9:03:27 p.m.
Task at time: 28/04/2016 9:02:36 p.m.
Total item count: 3
Posting to To Do list at 28/04/2016 9:03:46 p.m.
Enjoy!
Wednesday, April 13, 2016
ADFS : Local CP LDAP PowerShell Cmdlets
This is for Active Directory Federation Services on Server 2016 Technical Preview 4.
The previous post was around authenticating using AD LDS with ADFS. You have to use PowerShell. There is currently no support in the wizard.
The available cmdlets are:
get-help Add-AdfsLocalClaimsProviderTrust
NAME
Add-AdfsLocalClaimsProviderTrust
SYNTAX
Add-AdfsLocalClaimsProviderTrust -Name -Identifier -LdapServerConnection -UserObjectClass -UserContainer -AnchorClaimLdapAttribute -AnchorClaimType
[-AcceptanceTransformRules] [-AcceptanceTransformRulesFile ] [-Enabled ] [-Notes ] [-OrganizationalAccountSuffix ] [-Force] [-Type ] [-PassThru] [-WhatIf] [-Confirm]
[-LdapAuthenticationMethod {Basic | Kerberos | Negotiate}] [-LdapAttributeToClaimMapping ] []
get-help Disable-AdfsLocalClaimsProviderTrust
NAME
Disable-AdfsLocalClaimsProviderTrust
SYNTAX
Disable-AdfsLocalClaimsProviderTrust -TargetClaimsProviderTrust [-PassThru] [-WhatIf] [-Confirm] []
Disable-AdfsLocalClaimsProviderTrust -TargetIdentifier [-PassThru] [-WhatIf] [-Confirm] []
Disable-AdfsLocalClaimsProviderTrust -TargetName [-PassThru] [-WhatIf] [-Confirm] []
get-help Enable-AdfsLocalClaimsProviderTrust
NAME
Enable-AdfsLocalClaimsProviderTrust
SYNTAX
Enable-AdfsLocalClaimsProviderTrust -TargetClaimsProviderTrust [-PassThru] [-WhatIf] [-Confirm] []
Enable-AdfsLocalClaimsProviderTrust -TargetIdentifier [-PassThru] [-WhatIf] [-Confirm] []
Enable-AdfsLocalClaimsProviderTrust -TargetName [-PassThru] [-WhatIf] [-Confirm] []
get-help Get-AdfsLocalClaimsProviderTrust
NAME
Get-AdfsLocalClaimsProviderTrust
SYNTAX
Get-AdfsLocalClaimsProviderTrust [[-Name]] []
Get-AdfsLocalClaimsProviderTrust [-Identifier] []
get-help Remove-AdfsLocalClaimsProviderTrust
NAME
Remove-AdfsLocalClaimsProviderTrust
SYNTAX
Remove-AdfsLocalClaimsProviderTrust -TargetClaimsProviderTrust [-PassThru] [-WhatIf] [-Confirm] []
Remove-AdfsLocalClaimsProviderTrust -TargetIdentifier [-PassThru] [-WhatIf] [-Confirm] []
Remove-AdfsLocalClaimsProviderTrust -TargetName [-PassThru] [-WhatIf] [-Confirm] []
get-help Set-AdfsLocalClaimsProviderTrust
NAME
Set-AdfsLocalClaimsProviderTrust
SYNTAX
Set-AdfsLocalClaimsProviderTrust -TargetClaimsProviderTrust [-AcceptanceTransformRules ] [-AcceptanceTransformRulesFile ] [-Name ] [-Notes ] [-OrganizationalAccountSuffix
] [-Force] [-PassThru] [-WhatIf] [-Confirm] []
Set-AdfsLocalClaimsProviderTrust -TargetIdentifier [-AcceptanceTransformRules ] [-AcceptanceTransformRulesFile ] [-Name ] [-Notes ] [-OrganizationalAccountSuffix ] [-Force]
[-PassThru] [-WhatIf] [-Confirm] []
Set-AdfsLocalClaimsProviderTrust -TargetName [-AcceptanceTransformRules ] [-AcceptanceTransformRulesFile ] [-Name ] [-Notes ] [-OrganizationalAccountSuffix ] [-Force] [-PassThru]
[-WhatIf] [-Confirm] []
Enjoy!
The previous post was around authenticating using AD LDS with ADFS. You have to use PowerShell. There is currently no support in the wizard.
The available cmdlets are:
get-help Add-AdfsLocalClaimsProviderTrust
NAME
Add-AdfsLocalClaimsProviderTrust
SYNTAX
Add-AdfsLocalClaimsProviderTrust -Name
[-AcceptanceTransformRules
[-LdapAuthenticationMethod
get-help Disable-AdfsLocalClaimsProviderTrust
NAME
Disable-AdfsLocalClaimsProviderTrust
SYNTAX
Disable-AdfsLocalClaimsProviderTrust -TargetClaimsProviderTrust
Disable-AdfsLocalClaimsProviderTrust -TargetIdentifier
Disable-AdfsLocalClaimsProviderTrust -TargetName
get-help Enable-AdfsLocalClaimsProviderTrust
NAME
Enable-AdfsLocalClaimsProviderTrust
SYNTAX
Enable-AdfsLocalClaimsProviderTrust -TargetClaimsProviderTrust
Enable-AdfsLocalClaimsProviderTrust -TargetIdentifier
Enable-AdfsLocalClaimsProviderTrust -TargetName
get-help Get-AdfsLocalClaimsProviderTrust
NAME
Get-AdfsLocalClaimsProviderTrust
SYNTAX
Get-AdfsLocalClaimsProviderTrust [[-Name]
Get-AdfsLocalClaimsProviderTrust [-Identifier]
get-help Remove-AdfsLocalClaimsProviderTrust
NAME
Remove-AdfsLocalClaimsProviderTrust
SYNTAX
Remove-AdfsLocalClaimsProviderTrust -TargetClaimsProviderTrust
Remove-AdfsLocalClaimsProviderTrust -TargetIdentifier
Remove-AdfsLocalClaimsProviderTrust -TargetName
get-help Set-AdfsLocalClaimsProviderTrust
NAME
Set-AdfsLocalClaimsProviderTrust
SYNTAX
Set-AdfsLocalClaimsProviderTrust -TargetClaimsProviderTrust
Set-AdfsLocalClaimsProviderTrust -TargetIdentifier
[-PassThru] [-WhatIf] [-Confirm] [
Set-AdfsLocalClaimsProviderTrust -TargetName
[-WhatIf] [-Confirm] [
Enjoy!
ADFS : Authenticating with LDAP
This is for Active Directory Federation Services on Server 2016 Technical Preview 4.
Just to re-iterate - the ADFS has to be Server 2016 - TP4 and above. This will not work on Server 2012 R2 - ADFS 3.0.
I used the following for reference:
"AD FS supports any LDAP v3-compliant directory.
In order for AD FS to authenticate users from an LDAP directory, you must connect this LDAP directory to your AD FS farm by creating a local claims provider trust.
You can support multiple LDAP directories, each with its own configuration, within the same AD FS farm by adding multiple local claims provider trusts. In addition, AD DS forests that are not trusted by the forest that AD FS lives in can also be modelled as local claims provider trusts. You can create local claims provider trusts by using Windows PowerShell.
LDAP directories (local claims provider trusts) can co-exist with AD directories (claims provider trusts) on the same AD FS server, within the same AD FS farm, therefore, a single instance of AD FS is capable of authenticating and authorising access for users that are stored in both AD and non-AD directories.
Only forms-based authentication is supported for authenticating users from LDAP directories.
Certificate-based and Integrated Windows authentication are not supported for authenticating users in LDAP directories.
All passive authorisation protocols that are supported by AD FS, including SAML, WS-Federation, and OAuth are also supported for identities that are stored in LDAP directories.
The WS-Trust active authorisation protocol is also supported for identities that are stored in LDAP directories."
And:
"In ADFS v1.0 and ADFS v1.1 it was possible to use both AD and AD LDS / ADAM as an identity store. One of the very common scenarios is to use the AD identity store for internal users and use the AD LDS / ADAM identity store for external users (e.g. partners, customers, vendors, etc.).
All the ADFS versions starting with ADFS v2.0 and higher only supported AD as the identity store and nothing else. That could be one of the reasons why some companies remained using ADFS v1.x.
If you would like to support a similar scenario, where you would like to have a separate identity store for externals, you would need to either:
AD LDS is an instance of an LDAP and hence can be supported by ADFS 4.0. This means you can finally retire that instance of ADFS 1.x. Cue massive applause :-)
The previous post detailed how to run up an instance of AD LDS on Server 2016.
This all has to be done with PowerShell. The instance names are as per that previous post.
$DirectoryCred = Get-Credential
This pops up FBA. I used my domain admin. account.
$vendorDirectory = New-AdfsLdapServerConnection –HostName my-adfs.dev.local –Port 50000 –SslMode None –AuthenticationMethod Basic –Credential $DirectoryCred
$GivenName = New-AdfsLdapAttributeToClaimMapping –LdapAttribute givenName –ClaimType “http://schemas.xmlsoap.org/ws/2005/05/identity/claims/givenname”
$CommonName = New-AdfsLdapAttributeToClaimMapping –LdapAttribute cn –ClaimType “http://schemas.xmlsoap.org/claims/CommonName”
$Surname = New-AdfsLdapAttributeToClaimMapping –LdapAttribute sn –ClaimType “http://schemas.xmlsoap.org/ws/2005/05/identity/claims/surname”
Add-AdfsLocalClaimsProviderTrust –Name "AD LDS" –Identifier "TP4-1" –Type Ldap -LdapServerConnection $vendorDirectory –UserObjectClass user –UserContainer "CN=ADFS,DC=dev,DC=local" –LdapAuthenticationMethod Basic –AnchorClaimLda
pAttribute mail –AnchorClaimType "http://schemas.xmlsoap.org/ws/2005/05/identity/claims/upn" –LdapAttributeToClaimMapping @($GivenName, $Surname, $CommonName) -AcceptanceTransformRules "@RuleName = `"Issue All Mapped Claims`"`nc:[] => is
sue(claim = c);" –Enabled $true
This will give a warning:
"WARNING: PS0245: Because no organizational account suffixes were specified, this claims provider trust will not be accessible by requests that use the active profile."
If you want this, you need:
Set-AdfsClaimsProviderTrust -TargetName "AD LDS" -OrganizationalAccountSuffix @("dev.local")
Note that the HRD screens will then be slightly different. You can see examples of this in the second article above.
When I setup the local CP trust, I got an error around invalid credentials. I eventually noticed that I had omitted to define $Surname. Once I fixed that, the error went away. That error is very misleading!
Also note that the new CP will not be displayed in the ADFS wizard.
You can, however, see it with:
(This makes sense when you remember that AD LDS is just the Identity repository. The actual protocol layer is handled by ADFS).
When we run up the sample, we see the expected HRD.

Authenticating with "adamuser1@dev.local" we get the expected JWT claims:

Goodbye ADFS 1.x!
Enjoy!
Just to re-iterate - the ADFS has to be Server 2016 - TP4 and above. This will not work on Server 2012 R2 - ADFS 3.0.
I used the following for reference:
- Configure AD FS to authenticate users stored in LDAP directories
- Configuring A New Identity Store As A Claims Provider In ADFS
"AD FS supports any LDAP v3-compliant directory.
In order for AD FS to authenticate users from an LDAP directory, you must connect this LDAP directory to your AD FS farm by creating a local claims provider trust.
You can support multiple LDAP directories, each with its own configuration, within the same AD FS farm by adding multiple local claims provider trusts. In addition, AD DS forests that are not trusted by the forest that AD FS lives in can also be modelled as local claims provider trusts. You can create local claims provider trusts by using Windows PowerShell.
LDAP directories (local claims provider trusts) can co-exist with AD directories (claims provider trusts) on the same AD FS server, within the same AD FS farm, therefore, a single instance of AD FS is capable of authenticating and authorising access for users that are stored in both AD and non-AD directories.
Only forms-based authentication is supported for authenticating users from LDAP directories.
Certificate-based and Integrated Windows authentication are not supported for authenticating users in LDAP directories.
All passive authorisation protocols that are supported by AD FS, including SAML, WS-Federation, and OAuth are also supported for identities that are stored in LDAP directories.
The WS-Trust active authorisation protocol is also supported for identities that are stored in LDAP directories."
And:
"In ADFS v1.0 and ADFS v1.1 it was possible to use both AD and AD LDS / ADAM as an identity store. One of the very common scenarios is to use the AD identity store for internal users and use the AD LDS / ADAM identity store for external users (e.g. partners, customers, vendors, etc.).
All the ADFS versions starting with ADFS v2.0 and higher only supported AD as the identity store and nothing else. That could be one of the reasons why some companies remained using ADFS v1.x.
If you would like to support a similar scenario, where you would like to have a separate identity store for externals, you would need to either:
- Configure a separate AD with its own ADFS infrastructure and configure federation between them
- Use Azure AD to store those identities and configure federation"
AD LDS is an instance of an LDAP and hence can be supported by ADFS 4.0. This means you can finally retire that instance of ADFS 1.x. Cue massive applause :-)
The previous post detailed how to run up an instance of AD LDS on Server 2016.
This all has to be done with PowerShell. The instance names are as per that previous post.
$DirectoryCred = Get-Credential
This pops up FBA. I used my domain admin. account.
$vendorDirectory = New-AdfsLdapServerConnection –HostName my-adfs.dev.local –Port 50000 –SslMode None –AuthenticationMethod Basic –Credential $DirectoryCred
$GivenName = New-AdfsLdapAttributeToClaimMapping –LdapAttribute givenName –ClaimType “http://schemas.xmlsoap.org/ws/2005/05/identity/claims/givenname”
$CommonName = New-AdfsLdapAttributeToClaimMapping –LdapAttribute cn –ClaimType “http://schemas.xmlsoap.org/claims/CommonName”
$Surname = New-AdfsLdapAttributeToClaimMapping –LdapAttribute sn –ClaimType “http://schemas.xmlsoap.org/ws/2005/05/identity/claims/surname”
Add-AdfsLocalClaimsProviderTrust –Name "AD LDS" –Identifier "TP4-1" –Type Ldap -LdapServerConnection $vendorDirectory –UserObjectClass user –UserContainer "CN=ADFS,DC=dev,DC=local" –LdapAuthenticationMethod Basic –AnchorClaimLda
pAttribute mail –AnchorClaimType "http://schemas.xmlsoap.org/ws/2005/05/identity/claims/upn" –LdapAttributeToClaimMapping @($GivenName, $Surname, $CommonName) -AcceptanceTransformRules "@RuleName = `"Issue All Mapped Claims`"`nc:[] => is
sue(claim = c);" –Enabled $true
This will give a warning:
"WARNING: PS0245: Because no organizational account suffixes were specified, this claims provider trust will not be accessible by requests that use the active profile."
If you want this, you need:
Set-AdfsClaimsProviderTrust -TargetName "AD LDS" -OrganizationalAccountSuffix @("dev.local")
Note that the HRD screens will then be slightly different. You can see examples of this in the second article above.
When I setup the local CP trust, I got an error around invalid credentials. I eventually noticed that I had omitted to define $Surname. Once I fixed that, the error went away. That error is very misleading!
Also note that the new CP will not be displayed in the ADFS wizard.
You can, however, see it with:
Get-AdfsLocalClaimsProviderTrustTo test this I used the OpenID Connect sample referred to in one of my previous posts. Yes, you read that correctly. Not only are we going to authenticate on AD LDS with ADFS, we are going to use the OpenID Connect protocol. Neat!
UserObjectClass : user
UserContainer : CN=ADFS,DC=dev,DC=local
AnchorClaimLdapAttribute : mail
LdapAuthenticationMethod : Basic
LdapServerConnection : {my-adfs.dev.local}
LdapAttributeToClaimMapping : {Microsoft.IdentityServer.Management.Resources.LdapAttributeToClaimMapping, Microsoft.IdentityServer.Management.Resources.LdapAttributeToClaimMapping,
Microsoft.IdentityServer.Management.Resources.LdapAttributeToClaimMapping}
LocalClaimsProviderType : Ldap
AnchorClaimType : http://schemas.xmlsoap.org/ws/2005/05/identity/claims/upn
IdentifierType : http://schemas.microsoft.com/ws/2009/12/identityserver/principaltypes/uri
Identities : {http://schemas.microsoft.com/ws/2009/12/identityserver/TP4-1}
AcceptanceTransformRules : @RuleName = "Issue All Mapped Claims"
c:[]
=> issue(claim = c);
OrganizationalAccountSuffix : {}
Enabled : True
IsLocal : True
Identifier : TP4-1
Name : AD LDS
Notes :
ProtocolProfile : WsFed-SAML
(This makes sense when you remember that AD LDS is just the Identity repository. The actual protocol layer is handled by ADFS).
When we run up the sample, we see the expected HRD.

Authenticating with "adamuser1@dev.local" we get the expected JWT claims:

Goodbye ADFS 1.x!
Enjoy!
Tuesday, April 12, 2016
Windows Server : Installing AD LDS
This is for Active Directory Lightweight Directory Service on Server 2016 Technical Preview 4.
Note that it is not specific to Server 2016. That's the one I used because this is in preparation for my next post.
AD LDS (aka ADAM) is a Lightweight Directory Service (a poor man's AD!) which is not domain bound and is used mainly for application attributes i.e. you can keep all the application specific stuff. Each application lives in a container. You can have many instances on one server and the schemas of each can be different.
As you may have guessed, TP4 allows ADFS to authenticate against a V3 LDAP of which AD LDS happens to be but one example.
So from Server Manager, Manage / Add Roles.

Once complete, select the LDS wizard. (Also note ADSI Edit which we will use later).

Select "Unique Instance" Next.
Select a Name. I used "TP4-1". Next.

The default ports should show as 50000 and 50001 for the first instance. You can change them if you wish. Next.
Create a partition and give it a name. I used "CN=ADFS,DC=dev,DC=local". (dev.local is my domain). Next. Next.

I used the Network Service Account. Next.
I used the currently logged on user. Next.
Select the MS-User.LDF LDIF. Next.

Next out.
Now if you look in Services you will see:
 Now we use ADSI Edit.
Action / Connect.
 Now we need to add a user as below.
Right click on Roles, New Object. Choose "user"

Next.
Pick a user name e.g. adamuser1 and then Next out.
Right click on the user and choose "Reset Password". Enter the password twice.

Now double click on the user. (Or right click - Properties). I had:
cn = adamuser1
displayName = Adam User1
givenName = Adam
mail = adamuser1@dev.local
msDS-UserAccountDisabled = FALSE
name = adamuser1
sn = User1
userPrincipalName = adamuser1@dev.local
and we are done!
From the cmd prompt, you can check:
Enjoy!
Note that it is not specific to Server 2016. That's the one I used because this is in preparation for my next post.
AD LDS (aka ADAM) is a Lightweight Directory Service (a poor man's AD!) which is not domain bound and is used mainly for application attributes i.e. you can keep all the application specific stuff. Each application lives in a container. You can have many instances on one server and the schemas of each can be different.
As you may have guessed, TP4 allows ADFS to authenticate against a V3 LDAP of which AD LDS happens to be but one example.
So from Server Manager, Manage / Add Roles.

Once complete, select the LDS wizard. (Also note ADSI Edit which we will use later).

Select "Unique Instance" Next.
Select a Name. I used "TP4-1". Next.

The default ports should show as 50000 and 50001 for the first instance. You can change them if you wish. Next.
Create a partition and give it a name. I used "CN=ADFS,DC=dev,DC=local". (dev.local is my domain). Next. Next.

I used the Network Service Account. Next.
I used the currently logged on user. Next.
Select the MS-User.LDF LDIF. Next.

Next out.
Now if you look in Services you will see:

Action / Connect.

Right click on Roles, New Object. Choose "user"

Next.
Pick a user name e.g. adamuser1 and then Next out.
Right click on the user and choose "Reset Password". Enter the password twice.

Now double click on the user. (Or right click - Properties). I had:
cn = adamuser1
displayName = Adam User1
givenName = Adam
mail = adamuser1@dev.local
msDS-UserAccountDisabled = FALSE
name = adamuser1
sn = User1
userPrincipalName = adamuser1@dev.local
and we are done!
From the cmd prompt, you can check:
C:\>dsdbutil
dsdbutil: list instances
Instance Name: NTDS
LDAP Port: 389
SSL Port: 636
Install folder: C:\Windows\NTDS
Database file: C:\Windows\NTDS\ntds.dit
Log folder: C:\Windows\NTDS
NTDS Mode : Active Directory Domain Controller Mode
Instance Name: TP4-1
Long Name: TP4-1
LDAP Port: 50000
SSL Port: 50001
Install folder: C:\Windows\
Database file: C:\Program Files\Microsoft ADAM\TP4-1\data\adamntds.dit
Log folder: C:\Program Files\Microsoft ADAM\TP4-1\data
Service state: Running
Enjoy!
Thursday, March 31, 2016
ADFS - Native Client and Web API on Server 2016 TP4 ADFS 4.0
This follows on from my previous post concerning Web App and Web API.
This is for Active Directory Federation Services on Server 2016 Technical Preview 4.
The code is based on the Azure AD sample: Active directory .NET native desktop.
Just ignore all the Azure AD comments. There is no Azure in this solution.
In the solution, I've set the the web API to be at localhost:44324.
The native desktop client is built on WPF.
Just to re-iterate - the ADFS has to be Server 2016 - TP4 and above. This will not work on Server 2012 R2 - ADFS 3.0.
As before, the changes are all in a gist here.
On to the ADFS configuration:
You need to create a new Application Group.

Create the Native Client

The Client Id needs to be copied over into "ida:ClientId" in the app.config.
Create the web API.

The rest of the configuration is exactly the same as the previous post.
Exactly the same claims rules are required.
You end up with a new application group.

Note in the gist that the code around scope has been commented out. I couldn't get the scope to be passed over.
I raised this in the TP4 forum.
Run up the sample, click "Sign In" in the WPF application and you should be redirected to ADFS for authentication.
Then you should be able to add items to the to-do list.
Enjoy!
This is for Active Directory Federation Services on Server 2016 Technical Preview 4.
The code is based on the Azure AD sample: Active directory .NET native desktop.
Just ignore all the Azure AD comments. There is no Azure in this solution.
In the solution, I've set the the web API to be at localhost:44324.
The native desktop client is built on WPF.
Just to re-iterate - the ADFS has to be Server 2016 - TP4 and above. This will not work on Server 2012 R2 - ADFS 3.0.
As before, the changes are all in a gist here.
On to the ADFS configuration:
You need to create a new Application Group.

Create the Native Client

The Client Id needs to be copied over into "ida:ClientId" in the app.config.
Create the web API.

The rest of the configuration is exactly the same as the previous post.
Exactly the same claims rules are required.
You end up with a new application group.

Note in the gist that the code around scope has been commented out. I couldn't get the scope to be passed over.
I raised this in the TP4 forum.
Run up the sample, click "Sign In" in the WPF application and you should be redirected to ADFS for authentication.
Then you should be able to add items to the to-do list.
Enjoy!
Tuesday, March 22, 2016
ADFS - Web App and Web API on Server 2016 TP4 ADFS 4.0
This is for Active Directory Federation Services on Server 2016 Technical Preview 4.
A looooong journey to get this to work because there is (as I write) absolutely no documentation on how to do this. Much midnight oil.
I based this on the Active directory dotnet webapp webapi openidconnect sample.
There is also some useful stuff on OpenId Connect Web Sign On with ADFS in Windows Server 2016 TP3 and Securing a Web API with ADFS on WS2012 R2 Got Even Easier.
This sample has a web app and a web API. The web app connects with OpenID Connect and then calls a ToDoList web API using OAuth with the auth. token from the OpenId Connect call.
Both the web app and the web API are protected by ADFS 4.0.
Now the Open ID Connect part is relatively simple. I've got it working before (see earlier blog entries).
The web API is another kettle of fish :-)
Eventually, I figured it out from Vittorio's new book Modern Authentication with Azure Active Directory for Web Applications. (Seriously, just buy it!).
I have put the important code gists here.
Disclaimer: Don't use this in a Production system e.g. I just simulated a token store. Use at your own risk! Use this as a guide.
The logout is commented out because apparently that doesn't work yet. The Profile tab won't work because that gets user details via the Graph API to Azure AD.
Just ignore all the Azure AD comments. There is no Azure in this solution.
In the solution, the web app is at localhost:44322 and the web API is at localhost:44321.
Just to re-iterate - the ADFS has to be Server 2016 - TP4 and above. This will not work on Server 2012 R2 - ADFS 3.0. (Just for a start, ADFS 3.0 has no OpenID Connect support).
On to the ADFS configuration:
You need to create a new Application Group.

Then select "Server Application or Website".

Give it a name and click next.

Save the client identifier somewhere.
The URI is https://localhost:44322/.
Click Add then Next.

You want a shared secret so click the box and copy to clipboard and save somewhere. You cannot get back to this value. This is exactly how the secret key process in Azure AD works. You can however generate a new one.
Click Next.

You will see a summary.
Click Next.
And the group is successfully created.
Now here's the trick and the bit that held me up. We want to add a web API. So we click the "Add" button on the group screen and not the new group as we did above.

Select Web API

and then Next.

Enter the identifier, then Add and Next.
The identifier is https://localhost:44321/.

For now, we just go with "Permit everyone".
Click Next.

You'll see the web app is automatically included in the permissions but you can add more.
Essentially the web app has default permissions to all the web API in the application group.
Select "user_impersonation" and click Next.
You get a summary.

Click Next.
And the web API entry is created.
You should now see both.

Now we need to add some claims.
Click Edit.
You'll see a number of tabs.

Click "Issuance Transform Rules".
Now we are in familiar territory :-).
We add some claims rules.

viz. a LDAP rule for email and a transform rule to transform email to NameID with a format of email.
These are required because the sample uses these two claims.
Save these and you are done.
Remember to add the clientID and the secret that you saved to the ClientId and AppKey entries in the web app web.config.
Run up the sample, you should be redirected to ADFS for authentication.
Then click the "ToDo List" and you should be able to add items to the list.
Hopefully, you should not have to battle as much as I did.
Enjoy!
A looooong journey to get this to work because there is (as I write) absolutely no documentation on how to do this. Much midnight oil.
I based this on the Active directory dotnet webapp webapi openidconnect sample.
There is also some useful stuff on OpenId Connect Web Sign On with ADFS in Windows Server 2016 TP3 and Securing a Web API with ADFS on WS2012 R2 Got Even Easier.
This sample has a web app and a web API. The web app connects with OpenID Connect and then calls a ToDoList web API using OAuth with the auth. token from the OpenId Connect call.
Both the web app and the web API are protected by ADFS 4.0.
Now the Open ID Connect part is relatively simple. I've got it working before (see earlier blog entries).
The web API is another kettle of fish :-)
Eventually, I figured it out from Vittorio's new book Modern Authentication with Azure Active Directory for Web Applications. (Seriously, just buy it!).
I have put the important code gists here.
Disclaimer: Don't use this in a Production system e.g. I just simulated a token store. Use at your own risk! Use this as a guide.
The logout is commented out because apparently that doesn't work yet. The Profile tab won't work because that gets user details via the Graph API to Azure AD.
Just ignore all the Azure AD comments. There is no Azure in this solution.
In the solution, the web app is at localhost:44322 and the web API is at localhost:44321.
Just to re-iterate - the ADFS has to be Server 2016 - TP4 and above. This will not work on Server 2012 R2 - ADFS 3.0. (Just for a start, ADFS 3.0 has no OpenID Connect support).
On to the ADFS configuration:
You need to create a new Application Group.

Then select "Server Application or Website".

Give it a name and click next.

Save the client identifier somewhere.
The URI is https://localhost:44322/.
Click Add then Next.

You want a shared secret so click the box and copy to clipboard and save somewhere. You cannot get back to this value. This is exactly how the secret key process in Azure AD works. You can however generate a new one.
Click Next.

You will see a summary.
Click Next.
And the group is successfully created.
Now here's the trick and the bit that held me up. We want to add a web API. So we click the "Add" button on the group screen and not the new group as we did above.

Select Web API

and then Next.

Enter the identifier, then Add and Next.
The identifier is https://localhost:44321/.

For now, we just go with "Permit everyone".
Click Next.

You'll see the web app is automatically included in the permissions but you can add more.
Essentially the web app has default permissions to all the web API in the application group.
Select "user_impersonation" and click Next.
You get a summary.

Click Next.
And the web API entry is created.
You should now see both.

Now we need to add some claims.
Click Edit.
You'll see a number of tabs.

Click "Issuance Transform Rules".
Now we are in familiar territory :-).
We add some claims rules.

viz. a LDAP rule for email and a transform rule to transform email to NameID with a format of email.
These are required because the sample uses these two claims.
Save these and you are done.
Remember to add the clientID and the secret that you saved to the ClientId and AppKey entries in the web app web.config.
Run up the sample, you should be redirected to ADFS for authentication.
Then click the "ToDo List" and you should be able to add items to the list.
Hopefully, you should not have to battle as much as I did.
Enjoy!
Subscribe to:
Posts (Atom)