Showing posts with label Auth0. Show all posts

Wednesday, June 20, 2018

Auth0 playground

Auth0 have a neat playground where you can play around with the Lock settings.

Lock is the Auth0 login component.

I was trying to get some extra fields added when the user wants to self-register and we want to capture some extra information.

There are examples but they don't have context i.e. they show you what attribute to set but you don't get to see the full picture.

As usual, the gist is here.


This is the basic screen - notice I've added some of the Asian social providers like Baidu. This isn't part of the js - it's part of the application configuration.


Here is the signup screen. Clicking "United States" shows the drop-down. Also notice the checkbox at the bottom.


Shortening the text shows the error message that is part of the validation.


Enjoy!

Friday, September 29, 2017

Auth0 : The connection was disabled

I was trying to set up an enterprise connection in Auth0 to my ADFS instance.

When I tried the "Test" button on the enterprise connection, I got:

"description": "the connection was disabled"

WTF?

Eventually I realised that this is because I do not have a client that is configured under "Connections" to use that enterprise connection.

Assigned this to a client and viola! all is well.

That error message needs improvement!

Enjoy!

Monday, August 15, 2016

OAuth2 : Verifying the Azure AD JWT signature

Was having a look at Azure AD and JWT tokens and was wondering how the signature was calculated?

I use this useful utility from Auth0 to decode the tokens.

So I paste either the access or identity token into the "Encoded" box and set the "Algorithm" drop down to "RS256" (as below in bold). Problem is the signature is invalid. So how do I verify it.?

Looking at a typical token header,

{
  "typ": "JWT",
  "alg": "RS256",
  "kid": "MnC_VZcATfM5pOYiJHMba9goEKY"
}


we see the algorithm and the reference to the public key.

In Azure AD, we can get the OAuth 2.0 details from the discovery endpoint viz.


and that gives us:

"authorization_endpoint": "https://login.microsoftonline.com/common/oauth2/
    authorize",
    "token_endpoint": "https://login.microsoftonline.com/common/oauth2/token",
    "token_endpoint_auth_methods_supported": [
        "client_secret_post",
        "private_key_jwt"
    ],
    "jwks_uri": "https://login.microsoftonline.com/common/discovery/keys",
    "response_modes_supported": [
        "query",
        "fragment",
        "form_post"
    ],
... 

Now if we go to the key endpoint (bold above), we see:

"keys": [
        {
            "kty": "RSA",
            "use": "sig",
            "kid": "MnC_VZcATfM5pOYiJHMba9goEKY",
            "x5t": "MnC_VZcATfM5pOYiJHMba9goEKY",
            "n": "vIqz-4-ER_vNWLON9yv8hIYV737...NOhfXgelixLUQ",
            "e": "AQAB",
            "x5c": [
                "MIIC4jCCAc...H3/bKkLSuDaKLWSqMhozdhXsIIKvJQ=="
            ]
        },
... 

There is  more than one of these sets. You need the one whose "kid" matches the "kid" in the JWT header.

The "x5c" is the public key. Copy the entire string e.g. from "MIIC" to "JQ==" in the above to Notepad.

Now add:

"-----BEGIN CERTIFICATE-----"

at the beginning and add:

"-----END CERTIFICATE-----"

at the end.

You should have something like:

-----BEGIN CERTIFICATE-----
MIIC4jCCAc
...
H3/bKkLSuDaKLWSqMhozdhXsIIKvJQ==
-----END CERTIFICATE-----

Now paste that into the "Verify Signature" box and you'll see the "Signature Verified" message at the bottom in blue.

Enjoy!

Tuesday, June 09, 2015

ADFS : OpenID Connect and ADAL


This is for Active Directory Federation Services / "AD FS" / ADFS on Windows Server 2016 (currently Technical Preview 2).

My server is in an Azure VM.

It also uses the Active Directory Authentication Library (ADAL).

This is based on AzureADSamples/WebApp-WebAPI-OpenIDConnect-DotNet.

This is for Azure AD and is a web application that requires authentication with AAD and then calls a secure Web API that uses the current JSON token. The Web API is the Graph API that you use to get attributes from AAD.

So let's translate this to ADFS which now supports OpenID Connect. Somewhat annoying that all the samples are for Azure and none for ADFS, ADFS needs to feel the love :-).

<add key="todo:TodoListResourceid" value="https://myPC/TodoListService" />
<add key="todo:TodoListBaseAddress" value="https://myPC" />
<add key="ida:ClientId" value="OpenIDConnect1234" />
<add key="ida:AppKey" value="[Enter app key as obtained from Azure Portal, e.g. dYfh0H8iRU7FIBnPcYIil/Af6SSAwkxVhB0mA8DbzdQ=]" />
<add key="ida:Tenant" value="adfs.local.cloudapp.net" />
<!--<add key="ida:AADInstance" value="https://login.microsoftonline.com/{0}" />-->
<add key="ida:AADInstance" value="https://adfs.local.cloudapp.net/adfs" />
<add key="ida:PostLogoutRedirectUri" value="https://myPC/TodoListWebApp" />

Changes for the application web.config as above.

I changed StartUp.Auth.cs to the simpler:

app.SetDefaultSignInAsAuthenticationType(CookieAuthenticationDefaults.AuthenticationType);
app.UseCookieAuthentication(new CookieAuthenticationOptions());
app.UseOpenIdConnectAuthentication(
     new OpenIdConnectAuthenticationOptions
     {
         ClientId = clientId,
         Authority = Authority,
         PostLogoutRedirectUri = postLogoutRedirectUri,
     });

The ADFS client OAuth configuration is:


 OK - so let's run up this puppy.

We get this error:

MSIS9221: Received invalid OAuth authorization request. The 'redirect_uri' parameter is missing or found empty. Public clients must send the redirect_uri parameter with valid redirect URI in the OAuth authorization request.

Looked through the OWIN code and couldn't see anywhere where this is passed.

So I manually added it to the URL at the end in the browser:

 &redirect_uri=https%3A%2F%2FmyPC1%2FTodoListWebApp

Then off to ADFS, authenticate and back we come.

Clearly, still some work to do with ADAL and TP2!

Enjoy!

Monday, May 04, 2015

SSO : Using Salesforce as an IDP

Had a number of questions around this lately and thought I would write this up.

The use case is that you have an existing Salesforce account and you want to use this to authenticate against an application.

Note that Salesforce federates using SAML.

Points to do this:
  • Hook up ADFS as the RP (SP in SAML speak) and Salesforce as the IDP using SAML
  • I don't believe you can do this with Azure AD. That's because AAD is always the IDP and everything else is the SP. That's how Salesforce out the SaaS back-end of AAD works i.e. access via the Access Panel / myapps.
  • Use Auth0 as in SAML : ASP.NET MVC application talking to SAML IDP . In this scenario, you are using the Auth0 Enterprise connection and configuring the SAML parameters similar to the ADFS example.
  • Use Auth0 but in this case use Salesforce as in the "Third Party App". Here Auth0 does some of the heavy lifting for you but the end result is the same.
Note: Auth0 does have a neat "Salesforce Configuration Instructions" tutorial available when you configure Salesforce as a "Third Party App" but it doesn't seem to be publicly available. The document doesn't tell you what to do on the client side. You need to add Salesforce to the Lock widget under "Connections / Social".

Enjoy!

Wednesday, April 15, 2015

SAML : ASP.NET MVC application talking to SAML IDP

By popular demand (yeah - all two of you!) I've expanded my previous post for a .MVC application.

SAML : .NET application talking to SAML IDP

Login to the Auth0 dashboard, create a new application.

Choose "Regular Web App." / ASP.NET.

You get a tutorial called "Using Auth0 with ASP.NET".

Make a project in VS - follow the tutorial.

I don't like IIS Express so I run in IIS but that's up to you.

If you logged in to the Auth0 dashboard, you see that the tutorial is pre-configured with the web.config settings. Neat!

Add the JS code for the widget somewhere - I just added it to the Contact page.

My callback URL is e.g.:

https://xxxWebApplication/LoginCallback.ashx

Remember to place this in the JS code (replace the dummy string there) and in the application entry in your dashboard under "Allowed Callback URLs".

Under Connections, remember to tick the ADFS-SAML entry as described in the previous blog entry referenced above.

OK - navigate to the website - Contact page - Login button. I only have the ADFS-SAML connection configured.


Make sure you have the SAML tracer tool enabled.

OK - click the login button - off to ADFS.

Authenticate.

(Note: If you get "Object reference not set to an instance of an object". it's probably because of proxy problems).

Now look at the SAML trace - you'll see a few orange SAML buttons - proving that you are talking to ADFS via SAML!


If you look at the LoginCallback,ashx.cs, you'll see code at the bottom to turn the JWT to a cookie ala the normal WIF SAML token flow. 

You can display this using the standard .NET WIF features (built into .NET 4.5) e.g.

How To: Build Claims-Aware ASP.NET MVC Web Application Using WIF

Remember to set the redirect at the bottom of the callback page.
context.Response.Redirect("Home/Contact");
 or whatever.

Enjoy!


Monday, April 13, 2015

SAML : .NET application talking to SAML IDP

I've blogged about this before viz:

SAML : SAML connectivity / toolkit

and the links inside that post.

The general problem is that you have a .NET application and you have a use case that requires you to authenticate with a SAML IDP.

There are two general approaches:
  • Add a SAML client side stack
  • Use something like ADFS as a bridge i.e. app --> WS Fed --> ADFS --> SAML --> IDP.
 Note that when I talk about SAML I refer to SAML-P (the protocol) as opposed to SAML (the token).

But then I came across Auth0.

This has an interesting approach. Instead of having many applications taking to many Identity repositories  (perhaps many-to-many - the spider's web scenario) , they have Identity aaS and each component has one connection into the circle. You then hook all the connections up with internal plumbing.

Internally, everything uses OpenID Connect. They also have something similar to the FIM metaverse concept i.e. a standard profile where they keep the essential information and that links all the different user identities together. So one profile holds that user's information for their Facebook, Twitter, ASP.NET Identity etc logins.

So how does this help the problem?

Auth0 provide a login widget (that they call Lock) that can be easily referenced by Javascript, code etc. This widget uses OpenID connect. The .NET applications uses this to get into the circle and then you configure another connection out of the circle which uses SAML to talk to the IDP. You then hook the two connections together.

Conceptually:

App --> OpenID Connect --> Auth0 --> SAML --> SAML IDP.

Now ADFS supports SAML-P so lets hook this all up as an exercise.

Following assumes you have an Auth0 developer account - which is free.

Auth0 has a number of samples on Github.

You can search for a MVC sample but for this particular investigation, I was interested in what Microsoft call a native device i.e. non-browser based. Mobile is a good example but so is command line or Windows Forms or WPF. There is a Forms / WPF example here.

In the example, where it says:

var auth0 = new Auth0Client(
   "{YOUR_AUTH0_DOMAIN}",
   "{YOUR_CLIENT_ID}");

You get these by creating a new App / API in the dashboard, Select:

Native Mobile App and then WPF / WinForms as the SDK Skip the Backend Platform.

You then get a tutorial. One neat thing is that if you log into the dashboard beforehand, all the tutorials are customised for your Auth0 domain and settings.The tutorial contains the settings you need, otherwise they are in the application settings for your application in the dashboard.

If you were looking for ASP.NET MVC, note that the only difference to the Forms / WPF approach is how you hook up to the widget i.e. you would use Javascript instead of C#. All the plumbing / configuration as below is identical.

Let's hook up the SAML.


Connections / Enterprise / SAML-P Identity Provider / Create New


You can give the connection any name you want and the URL's are the standard:

https://xxx/adfs/ls/

We'll ignore signing the request for now.

Now for the certificate:

ADFS wizard / Service / Certificates / right-click on Token-Signing / View certificate / Details tab / Copy to file

Choose Base 64 Encoded X509 (.CER)

Save this somewhere and then click "Upload Certificate" as above and upload it to Auth0.

Auth0 use a domain matching way to handle the typical Home Realm Discovery. In the "Email Domains" box above, enter a domain. This does not have to be a valid domain - just something that you can match on e.g. mysaml.co.nz. Yeah - I'm not wild about this either!

Now for the ADFS side - click on your new connection and then click the pencil (Setup). This shows the Auth0 endpoints or you can use the metadata link.

I just configured ADFS manually because I've done this so many times.

ADFS wizard / Trust Relationships / Relying Party Trusts / Add Relying Party Trust.

Going through the wizard:

Start / Enter data about the relying party manually / Next / Type any name you want / Next / AD FS profile / Next / ignore encryption so Next / Check enable support for SAML protocol- enter URL as below / Next / enter identifier as below / Add / Next / ignore MFA so Next / Permit all users / Next / Next / Close


Again, note that the strings above will reflect your Auth0 tenant and connection name.

Didn't bother with a signature because we are not signing the AuthnRequest. Note that these reflect the name I chose i.e. ADFS-SAML. You will use your name as reflected in the Auth0 endpoints.

Now edit the claims rules so they look like:


Now if you go back to your SAML connection in the Auth0 dashboard, you can click on the Try icon (the arrowhead) and if all goes well, it will come up with "It Works!". 


OK - so fire up the WPF application.


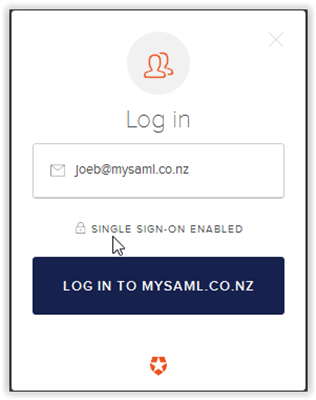
Enter e.g. joeb@mysaml.co.nz. This matched the Auth0 configuration so the Lock widget brings up the "Log in to mysaml.co.nz"

(BTW, if you are wondering about the social icons in the widget, this is configured in your application under Connections).

Click this and you will be redirected to ADFS where you can login as usual. Because you configured this to use SAML you now have a .NET application using SAML to authenticate. Neat!

Don't believe me? If you went with a standard MVC application and use FireFox, download the SAML tracer and run it (under Tools). Clear all your cookies, login in again and you'll see some of the entries in the trace have an orange SAML button.

Update: I wrote this up:

SAML : ASP.NET MVC application talking to SAML IDP

(BTW: I don't work for Auth0).

Enjoy!