I copy claims rules over all the time as per my earlier post.
So I did this and it wouldn't work.
Much head scratching and then I realised that one of the claims rules was a "Send Group Membership as a Claim".
If you look at this type of rule, it looks like:
c:[Type == "http://schemas.microsoft.com/ws/2008/06/identity/claims/groupsid", Value == "S-1-5-21-965288371-...-1106", Issuer == "AD AUTHORITY"]
=> issue(Type = "http://schemas.microsoft.com/ws/2008/06/identity/claims/role", Value = "Admin", Issuer = c.Issuer, OriginalIssuer = c.OriginalIssuer, ValueType = c.ValueType);
Notice that it has a SID and (of course) this SID is relevant to that instance of AD only.
The same group name in a different AD will have a different SID value.
So, beware, you can't just copy these types of rules over!
Enjoy!
Monday, June 12, 2017


Tuesday, June 06, 2017
ADFS : Adding extra text to the HRD screen IDP description
This is for Home Realm Discovery for Server 2012 R2 or 2016 (ADFS 3.0 or 4.0).
Building on from @Pierre's ADFS 2016 – Change the Active Directory claim provider display name in the Home Realm Discovery page.
As per that article, the IDP name is coded in the JavaScript as:
var strADCPName = "Corp Users" ;
What you can do is add a line of text beneath it:
This displays something like:
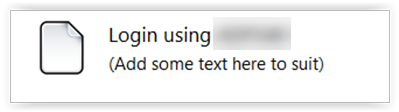
Because of the HTML there are only a limited amount of characters you can add but it is a neat way to add a better description.
If you are wondering how to change the icon (I just used a random one), refer:
ADFS : You can change anything in the Theme structure
Enjoy!
Building on from @Pierre's ADFS 2016 – Change the Active Directory claim provider display name in the Home Realm Discovery page.
As per that article, the IDP name is coded in the JavaScript as:
var strADCPName = "Corp Users" ;
What you can do is add a line of text beneath it:
var strADCPName = "Corp Users <br/><small>(Add some text here to suit)</small>" ;This displays something like:

Because of the HTML there are only a limited amount of characters you can add but it is a neat way to add a better description.
If you are wondering how to change the icon (I just used a random one), refer:
ADFS : You can change anything in the Theme structure
Enjoy!
Friday, June 02, 2017
ADFS : OAuth token timeout
This is for Server 2016 - ADFS 4.0.

These are the OpenID Connect / OAuth options that you have.
But nowhere in the wizard can you set the token timeout.
AD FS Scenarios for Developers shows the following PowerShell commands:
Add native client Add-AdfsNativeClientApplication
Add server application as client Add-AdfsServerApplication
Add Web API / resource Add-AdfsWebApiApplication
Building on this we can do:
get-AdfsNativeClientApplication
Name : AppA - Native application
Identifier : b1...28
ApplicationGroupIdentifier : AppA
Description :
Enabled : True
RedirectUri : {ms-app://s-45...04/}
get-AdfsServerApplication
ADUserPrincipalName :
ClientSecret : ********
JWTSigningCertificateRevocationCheck : None
JWTSigningKeys : {}
JWKSUri :
Name : AppB - Server application
Identifier : 8e...44
ApplicationGroupIdentifier : AppB
Description :
Enabled : True
RedirectUri : {https://localhost:1234/}
get-AdfsWebApiApplication
Name : AppA - Web API
Identifier : {https://localhost:44666/TodoListService}
AccessControlPolicyName : Permit everyone
AccessControlPolicyParameters :
AdditionalAuthenticationRules :
AllowedAuthenticationClassReferences : {}
AllowedClientTypes : Public, Confidential
ApplicationGroupIdentifier : AppA
ApplicationGroupId : 0e...cd
AlwaysRequireAuthentication : False
ClaimsProviderName : {}
DelegationAuthorizationRules :
Enabled : True
ImpersonationAuthorizationRules :
IssuanceAuthorizationRules :
IssueOAuthRefreshTokensTo : AllDevices
IssuanceTransformRules : @RuleTemplate = "LdapClaims"
... Some claims ...
NotBeforeSkew : 0
Description :
PublishedThroughProxy : False
RefreshTokenProtectionEnabled : False
RequestMFAFromClaimsProviders : False
ResultantPolicy : RequireFreshAuthentication:False
IssuanceAuthorizationRules:
{
Permit everyone
}
TokenLifetime : 480
And here we see a token lifetime!
But note the option only applies to web API.
To set this use:
set-AdfsWebApiApplication -TargetIdentifier "https://localhost:44666/TodoListService" -TokenLi
fetime 480
Enjoy!

These are the OpenID Connect / OAuth options that you have.
- Native application
- Server application
- Web API
But nowhere in the wizard can you set the token timeout.
AD FS Scenarios for Developers shows the following PowerShell commands:
Add native client Add-AdfsNativeClientApplication
Add server application as client Add-AdfsServerApplication
Add Web API / resource Add-AdfsWebApiApplication
Building on this we can do:
get-AdfsNativeClientApplication
Name : AppA - Native application
Identifier : b1...28
ApplicationGroupIdentifier : AppA
Description :
Enabled : True
RedirectUri : {ms-app://s-45...04/}
get-AdfsServerApplication
ADUserPrincipalName :
ClientSecret : ********
JWTSigningCertificateRevocationCheck : None
JWTSigningKeys : {}
JWKSUri :
Name : AppB - Server application
Identifier : 8e...44
ApplicationGroupIdentifier : AppB
Description :
Enabled : True
RedirectUri : {https://localhost:1234/}
get-AdfsWebApiApplication
Name : AppA - Web API
Identifier : {https://localhost:44666/TodoListService}
AccessControlPolicyName : Permit everyone
AccessControlPolicyParameters :
AdditionalAuthenticationRules :
AllowedAuthenticationClassReferences : {}
AllowedClientTypes : Public, Confidential
ApplicationGroupIdentifier : AppA
ApplicationGroupId : 0e...cd
AlwaysRequireAuthentication : False
ClaimsProviderName : {}
DelegationAuthorizationRules :
Enabled : True
ImpersonationAuthorizationRules :
IssuanceAuthorizationRules :
IssueOAuthRefreshTokensTo : AllDevices
IssuanceTransformRules : @RuleTemplate = "LdapClaims"
... Some claims ...
NotBeforeSkew : 0
Description :
PublishedThroughProxy : False
RefreshTokenProtectionEnabled : False
RequestMFAFromClaimsProviders : False
ResultantPolicy : RequireFreshAuthentication:False
IssuanceAuthorizationRules:
{
Permit everyone
}
TokenLifetime : 480
And here we see a token lifetime!
But note the option only applies to web API.
To set this use:
set-AdfsWebApiApplication -TargetIdentifier "https://localhost:44666/TodoListService" -TokenLi
fetime 480
Enjoy!
Friday, May 26, 2017
Thursday, May 25, 2017
ADFS : The case of the slanting quote
I don't know the official name of this character but it's the double quote sign that slants to the right.
There was a question on the forum about a claims rule that threw "POLICY0002: Could not parse policy data" when the user tried to save it.
It looked like:
c:[Type == "http://adatum.com/data1holder", Issuer == "AD AUTHORITY"]
=> issue(type = "http://adatum.com/data1", Value = RegExReplace(c.Value,”'”,””);
The problem was the slanting quotes in the RegExReplace.
Using the double quote key (") on the keyboard and replacing these gives:
c:[Type == "http://adatum.com/data1holder", Issuer == "AD AUTHORITY"]
=> issue(type = "http://adatum.com/data1", Value = RegExReplace(c.Value,"'","");
which parses no problem.
Enjoy!
There was a question on the forum about a claims rule that threw "POLICY0002: Could not parse policy data" when the user tried to save it.
It looked like:
c:[Type == "http://adatum.com/data1holder", Issuer == "AD AUTHORITY"]
=> issue(type = "http://adatum.com/data1", Value = RegExReplace(c.Value,”'”,””);
The problem was the slanting quotes in the RegExReplace.
Using the double quote key (") on the keyboard and replacing these gives:
c:[Type == "http://adatum.com/data1holder", Issuer == "AD AUTHORITY"]
=> issue(type = "http://adatum.com/data1", Value = RegExReplace(c.Value,"'","");
which parses no problem.
Enjoy!
Monday, May 15, 2017
ADFS : You can change anything in the Theme structure
The official document around onload.js and customising the ADFS login page for 2012 R2 and 2016 (ADFS 3.0 and 4.0) is here.
The Theme directory structure looks like:
Directory of C:\...\Theme\Custom
05/11/2017 09:26 PM .
05/11/2017 09:26 PM ..
05/11/2017 09:26 PM css
05/11/2017 09:26 PM illustration
05/11/2017 09:26 PM images
05/11/2017 09:26 PM script
0 File(s) 0 bytes
Directory of C:\...\Theme\Custom\css
05/11/2017 09:26 PM .
05/11/2017 09:26 PM ..
05/11/2017 09:26 PM 8,144 style.css
05/11/2017 09:26 PM 8,146 style.rtl.css
2 File(s) 16,290 bytes
Directory of C:\...\Theme\Custom\illustration
05/11/2017 09:26 PM .
05/11/2017 09:26 PM ..
05/11/2017 09:26 PM 116,699 illustration.png
1 File(s) 116,699 bytes
Directory of C:\...\Theme\Custom\images
05/11/2017 09:26 PM .
05/11/2017 09:26 PM ..
05/14/2017 08:45 PM idp
0 File(s) 0 bytes
Directory of C:\...\Theme\Custom\images\idp
05/14/2017 08:45 PM .
05/14/2017 08:45 PM ..
05/11/2017 09:26 PM 931 idp.png
05/11/2017 09:32 PM 1,727 localsts.png
05/11/2017 09:26 PM 1,977 otherorganizations.png
3 File(s) 4,635 bytes
Directory of C:\...\Theme\Custom\script
05/11/2017 09:26 PM .
05/11/2017 09:26 PM ..
05/11/2017 10:23 PM 5,925 onload.js
1 File(s) 5,925 bytes
The document refers to onload.js but you can use the same commands for any of the above files.
@Pierre e.g. has blogged on changing the "thumbnails" here.
The command for this then looks like:
Set-AdfsWebTheme -TargetName MyTheme -AdditionalFileResource @{Uri="/adfs/portal/images/idp/idp.png";path="C:\MyTheme\images\idp\idp-adfs.png"}
Enjoy!
The Theme directory structure looks like:
Directory of C:\...\Theme\Custom
05/11/2017 09:26 PM .
05/11/2017 09:26 PM ..
05/11/2017 09:26 PM css
05/11/2017 09:26 PM illustration
05/11/2017 09:26 PM images
05/11/2017 09:26 PM script
0 File(s) 0 bytes
Directory of C:\...\Theme\Custom\css
05/11/2017 09:26 PM .
05/11/2017 09:26 PM ..
05/11/2017 09:26 PM 8,144 style.css
05/11/2017 09:26 PM 8,146 style.rtl.css
2 File(s) 16,290 bytes
Directory of C:\...\Theme\Custom\illustration
05/11/2017 09:26 PM .
05/11/2017 09:26 PM ..
05/11/2017 09:26 PM 116,699 illustration.png
1 File(s) 116,699 bytes
Directory of C:\...\Theme\Custom\images
05/11/2017 09:26 PM .
05/11/2017 09:26 PM ..
05/14/2017 08:45 PM idp
0 File(s) 0 bytes
Directory of C:\...\Theme\Custom\images\idp
05/14/2017 08:45 PM .
05/14/2017 08:45 PM ..
05/11/2017 09:26 PM 931 idp.png
05/11/2017 09:32 PM 1,727 localsts.png
05/11/2017 09:26 PM 1,977 otherorganizations.png
3 File(s) 4,635 bytes
Directory of C:\...\Theme\Custom\script
05/11/2017 09:26 PM .
05/11/2017 09:26 PM ..
05/11/2017 10:23 PM 5,925 onload.js
1 File(s) 5,925 bytes
The document refers to onload.js but you can use the same commands for any of the above files.
@Pierre e.g. has blogged on changing the "thumbnails" here.
The command for this then looks like:
Set-AdfsWebTheme -TargetName MyTheme -AdditionalFileResource @{Uri="/adfs/portal/images/idp/idp.png";path="C:\MyTheme\images\idp\idp-adfs.png"}
Enjoy!
Friday, May 12, 2017
ADFS : Avoiding the Home Realm Discovery screen by using a link
I was asked if given the HRD screen is just "buttons" and there was a "link" behind that and users always picked the same one. could they not simply add the "link" to their web site and avoid the HRD screen altogether?
The basic problem with this is that the link is not static – it’s actually dynamic.
Take SAML-P as a example.
Assume the HRD screen has two entries; ADFS A and ADFS B.
The SAML request from the application to ADFS A gives:
https://adfs-a/adfs/ls/?SAMLRequest=…
And then selecting ADFS B via HRD gives:
https://adfs-b/adfs/ls/?SAMLRequest=...
The SAML request itself is different because as the packet goes through each ADFS, it’s signed with that ADFS’s signing key.
So the "link" would have to be updated every time a signing certificate changed.
In addition, a section of the SAML AuthnRequest contains:
IssueInstant="2017-05-11T01:27:25.56Z"
The request contains the time the request was sent – which is dynamic.
There is an ADFS parameter for SAML called “clock skew”.
ADFS rejects the request when the skew between the server clock and the time in the request is more than 30 seconds (by default).
So nice try but no cigar!
Enjoy!
The basic problem with this is that the link is not static – it’s actually dynamic.
Take SAML-P as a example.
Assume the HRD screen has two entries; ADFS A and ADFS B.
The SAML request from the application to ADFS A gives:
https://adfs-a/adfs/ls/?SAMLRequest=…
And then selecting ADFS B via HRD gives:
https://adfs-b/adfs/ls/?SAMLRequest=...
The SAML request itself is different because as the packet goes through each ADFS, it’s signed with that ADFS’s signing key.
So the "link" would have to be updated every time a signing certificate changed.
In addition, a section of the SAML AuthnRequest contains:
IssueInstant="2017-05-11T01:27:25.56Z"
The request contains the time the request was sent – which is dynamic.
There is an ADFS parameter for SAML called “clock skew”.
ADFS rejects the request when the skew between the server clock and the time in the request is more than 30 seconds (by default).
So nice try but no cigar!
Enjoy!
ADFS : Augmenting the default JWT with additional attributes
This is for Server 2016 - ADFS 4.0.
The standard use case is for an ASP.NET application using OpenID Connect / OAuth via the NuGet OWIN packages taking to ADFS.

The standard way is to configure a server application as above.
This all works . The problem is that the ADFS wizard does not have any way to configure claims rules. As a result you get the standard set of claims in the JWT.
aud 8173...1501
iss https://xxx.cloudapp.net/adfs
iat 1494378378
exp 1494381978
http://schemas.microsoft.com/ws/2008/06/identity/claims/authenticationinstant 1494378377
nonce 6362....NmVl
http://schemas.xmlsoap.org/ws/2005/05/identity/claims/nameidentifier 0JrA...H7k=
http://schemas.xmlsoap.org/ws/2005/05/identity/claims/upn user1@dev.local
http://schemas.xmlsoap.org/ws/2005/05/identity/claims/name DEV\user1
c_hash baOc...R8GA
The only user specific details are the "upn" and the "name".
But what if you want more?
You can use the "Web browser accessing a web application" profile as per this.
This profile achieves the result in a roundabout way:
"Behind the scenes, this template creates a native client and new app type called Web application, which is just a Web API with an Identifier (RPID) that matches the native client's client ID. This means the Web application is simultaneously client and resource, so you can assign issuance transform rules as you would with a Web API."
I configured some claims in the wizard:

Now when I authenticate, I get this:
aud c906...3ab4
iss https://xxx.cloudapp.net/adfs
iat 1494379409
exp 1494383009
http://schemas.microsoft.com/ws/2008/06/identity/claims/authenticationinstant 1494379408
nonce 6362...NTk2
http://schemas.xmlsoap.org/ws/2005/05/identity/claims/nameidentifier PRUA...50U=
http://schemas.xmlsoap.org/ws/2005/05/identity/claims/name DEV\user1
http://schemas.xmlsoap.org/ws/2005/05/identity/claims/upn user1@dev.local
http://schemas.xmlsoap.org/ws/2005/05/identity/claims/givenname User1
http://schemas.xmlsoap.org/ws/2005/05/identity/claims/surname Test
http://schemas.xmlsoap.org/ws/2005/05/identity/claims/emailaddress user1@company.com
http://schemas.xmlsoap.org/claims/CommonName User1 Test
apptype Public
appid c906...3ab4
http://schemas.microsoft.com/ws/2008/06/identity/claims/authenticationmethod urn:oasis:names:tc:SAML:2.0:ac:classes:PasswordProtectedTransport
ver 1.0
http://schemas.microsoft.com/identity/claims/scope openid
c_hash -0ZX...Z81A
You will also notice that the apptype is "Public" i.e. a web site as opposed to "confidential" i.e. a web API.
I also answered a question in stackoverflow along these lines here.
As per the discussion from @Efrain:
"As indicated in @nzpcmad's answer, it appears that custom claims in the id_token using the default URL-parameter-encoded GET redirect is simply not supported. The reason for this may be that there is an URL length limit, but I find that quite questionable.
Enjoy!
The standard use case is for an ASP.NET application using OpenID Connect / OAuth via the NuGet OWIN packages taking to ADFS.

The standard way is to configure a server application as above.
This all works . The problem is that the ADFS wizard does not have any way to configure claims rules. As a result you get the standard set of claims in the JWT.
aud 8173...1501
iss https://xxx.cloudapp.net/adfs
iat 1494378378
exp 1494381978
http://schemas.microsoft.com/ws/2008/06/identity/claims/authenticationinstant 1494378377
nonce 6362....NmVl
http://schemas.xmlsoap.org/ws/2005/05/identity/claims/nameidentifier 0JrA...H7k=
http://schemas.xmlsoap.org/ws/2005/05/identity/claims/upn user1@dev.local
http://schemas.xmlsoap.org/ws/2005/05/identity/claims/name DEV\user1
c_hash baOc...R8GA
The only user specific details are the "upn" and the "name".
But what if you want more?
You can use the "Web browser accessing a web application" profile as per this.
This profile achieves the result in a roundabout way:
"Behind the scenes, this template creates a native client and new app type called Web application, which is just a Web API with an Identifier (RPID) that matches the native client's client ID. This means the Web application is simultaneously client and resource, so you can assign issuance transform rules as you would with a Web API."
I configured some claims in the wizard:

Now when I authenticate, I get this:
aud c906...3ab4
iss https://xxx.cloudapp.net/adfs
iat 1494379409
exp 1494383009
http://schemas.microsoft.com/ws/2008/06/identity/claims/authenticationinstant 1494379408
nonce 6362...NTk2
http://schemas.xmlsoap.org/ws/2005/05/identity/claims/nameidentifier PRUA...50U=
http://schemas.xmlsoap.org/ws/2005/05/identity/claims/name DEV\user1
http://schemas.xmlsoap.org/ws/2005/05/identity/claims/upn user1@dev.local
http://schemas.xmlsoap.org/ws/2005/05/identity/claims/givenname User1
http://schemas.xmlsoap.org/ws/2005/05/identity/claims/surname Test
http://schemas.xmlsoap.org/ws/2005/05/identity/claims/emailaddress user1@company.com
http://schemas.xmlsoap.org/claims/CommonName User1 Test
apptype Public
appid c906...3ab4
http://schemas.microsoft.com/ws/2008/06/identity/claims/authenticationmethod urn:oasis:names:tc:SAML:2.0:ac:classes:PasswordProtectedTransport
ver 1.0
http://schemas.microsoft.com/identity/claims/scope openid
c_hash -0ZX...Z81A
You will also notice that the apptype is "Public" i.e. a web site as opposed to "confidential" i.e. a web API.
I also answered a question in stackoverflow along these lines here.
As per the discussion from @Efrain:
"As indicated in @nzpcmad's answer, it appears that custom claims in the id_token using the default URL-parameter-encoded GET redirect is simply not supported. The reason for this may be that there is an URL length limit, but I find that quite questionable.
Anyway, apparently this restriction does not apply when the token is
returned in a POST redirect. That's also why people describe it working
just fine for MVC applications.
So I was able to work around the problem by redirecting the response to a back-end API endpoint (POST), which just redirects it to the front-end (SPA) again, but as a GET request with URL-encoded parameters:
So I was able to work around the problem by redirecting the response to a back-end API endpoint (POST), which just redirects it to the front-end (SPA) again, but as a GET request with URL-encoded parameters:
public class LoginController : ApiController
{
    [HttpPost]
    [Route("login")]
    public HttpResponseMessage Login(FormDataCollection formData)
    {
        var token = formData["id_token"];
        var state = formData["state"];
        var response = Request.CreateResponse(HttpStatusCode.Moved);
        var frontendUri = ConfigurationManager.AppSettings["ad:FrontendUri"];
        response.Headers.Location = new Uri($"{frontendUri}#id_token={token}
&state={state}");
return response;
}
}
&response_mode=form_post to the OAuth request URL."Enjoy!
Monday, May 08, 2017
ADFS : Passing NameID across CP and RP
Imagine the following:
CP A --> federated with CP B --> RP
So a user goes to the RP and via HRD on CP B selects CP A and authenticates against AD.
The claims derived from CP A need to be passed across.
On CP A we have the standard LDAP rules since the user authenticated against that AD.
One of the claims we want to pass across is NameID.
You have to configure pass-through rules on CP B and the RP.
So the claims are configured in three places.
The problem is that NameID never makes it across.
There are a number of posts from people reporting the same thing but no solution.
The way I got around it was:
Assume that we want sAMAccountName to be NameID.
On CP A, have a LDAP rule:
sAMAccountName --> http://company/claims/sAMAccountName
Plus pass-through all the other claims.
On CP B, have a Transform rule:
http://company/claims/sAMAccountName --> NameID
Plus pass-through all the other claims.
In the RP, pass-through all the claims including NameID.
Now imagine you have two RP, RP A and RP B.
RP A wants sAMAccountName to be NameID.
RP B wants UPN to be NameID.
Now we have a problem because they both share the same pipeline CP A and CP B. You can't have two different rules both passing NameID.
What you have to do on CP A is:
UPN --> http://company/claims/UPN
Here you pass both http://company/claims/sAMAccountName and http://company/claims/UPN through on CP B and then transform them at the RP level to the NameID; one for each.
Enjoy!
CP A --> federated with CP B --> RP
So a user goes to the RP and via HRD on CP B selects CP A and authenticates against AD.
The claims derived from CP A need to be passed across.
On CP A we have the standard LDAP rules since the user authenticated against that AD.
One of the claims we want to pass across is NameID.
You have to configure pass-through rules on CP B and the RP.
So the claims are configured in three places.
The problem is that NameID never makes it across.
There are a number of posts from people reporting the same thing but no solution.
The way I got around it was:
Assume that we want sAMAccountName to be NameID.
On CP A, have a LDAP rule:
sAMAccountName --> http://company/claims/sAMAccountName
Plus pass-through all the other claims.
On CP B, have a Transform rule:
http://company/claims/sAMAccountName --> NameID
Plus pass-through all the other claims.
In the RP, pass-through all the claims including NameID.
Now imagine you have two RP, RP A and RP B.
RP A wants sAMAccountName to be NameID.
RP B wants UPN to be NameID.
Now we have a problem because they both share the same pipeline CP A and CP B. You can't have two different rules both passing NameID.
What you have to do on CP A is:
UPN --> http://company/claims/UPN
Here you pass both http://company/claims/sAMAccountName and http://company/claims/UPN through on CP B and then transform them at the RP level to the NameID; one for each.
Enjoy!
Wednesday, April 12, 2017
Visual Studio : ReplacableToken_ApplicationServices on transform
Using VS 2015 and doing a transform on my web.config.
My connection string is something like:
connectionString="data source=.\SQLEXPRESS;Integrated Security ..."
but what appears in the transformed file is:
connectionString="$(ReplacableToken_ApplicationServices-Web.config Connection String_0) ..."
WTF?
Much conversation with Mr. Google and eventually the solution is:
You need to add this to the appropriate .pubxml file under Properties\PublishProfiles
Enjoy!
My connection string is something like:
connectionString="data source=.\SQLEXPRESS;Integrated Security ..."
but what appears in the transformed file is:
connectionString="$(ReplacableToken_ApplicationServices-Web.config Connection String_0) ..."
WTF?
Much conversation with Mr. Google and eventually the solution is:
<AutoParameterizationWebConfigConnectionStrings>False</AutoParameterizationWebConfigConnectionStrings>You need to add this to the appropriate .pubxml file under Properties\PublishProfiles
Enjoy!
Thursday, April 06, 2017
C# : Sending email
I needed a quick and dirty C# module to test a SMTP server.
So I came up with this.
I used Windows Forms and a very simple button.
This uses the System.Net.Mail.MailMessage class.
Enjoy!
So I came up with this.
I used Windows Forms and a very simple button.
This uses the System.Net.Mail.MailMessage class.
Enjoy!
ASP.NET : Comparing a VS project to a web site
We have a legacy project which has been untouched and unloved for many years.
Then we needed to make an urgent change.
The problem was that the people who had worked on the project were long gone and nobody knew if the source in the repository was up to date?
So we took a copy of the web site,
You can't just compare this to the VS project. In VS, you have an aspx file and a corresponding cs file. In the web site, the aspx files are there but the cs files are all rolled up into a dll.
You can't directly compare dll either. There's guids, dates etc. that keep changing every time you do a build.
The way to do this is to deploy your current project to IIS and then compare the two web sites.
You still have the problem of comparing the dll files in the \bin directory.
To do this, decompile the dll into a VS project using something like Reflector or dotPeek and then compare the source code.
Some of the names will be different e.g. "isComplete" vs. "flag1" but it will give you a pretty good idea of whether there have been code changes,
Enjoy!
Then we needed to make an urgent change.
The problem was that the people who had worked on the project were long gone and nobody knew if the source in the repository was up to date?
So we took a copy of the web site,
You can't just compare this to the VS project. In VS, you have an aspx file and a corresponding cs file. In the web site, the aspx files are there but the cs files are all rolled up into a dll.
You can't directly compare dll either. There's guids, dates etc. that keep changing every time you do a build.
The way to do this is to deploy your current project to IIS and then compare the two web sites.
You still have the problem of comparing the dll files in the \bin directory.
To do this, decompile the dll into a VS project using something like Reflector or dotPeek and then compare the source code.
Some of the names will be different e.g. "isComplete" vs. "flag1" but it will give you a pretty good idea of whether there have been code changes,
Enjoy!
Subscribe to:
Posts (Atom)